Thunderboltとは何か? パソコン購入前に知っておきたいポイントを整理
Thunderboltとは何かを、パソコン購入を検討している人向けに整理します。Thunderbolt 4と5の違い、USB4との関係、製品ページで確認したいポイントをまとめています。
この記事で紹介するソースコードは自由に使っていただいて構いません。 アプリケーションの開発や自己学習にお役立て下さい。ただし、当ブログでは掲載するソースコードを流用・利用したことによる損害等につきましては 一切の責任を負いません。自己責任で利用お願いします。
この記事では、OpenWrtアプリケーション開発として、LuCI用プラグインの作成方法を紹介します。
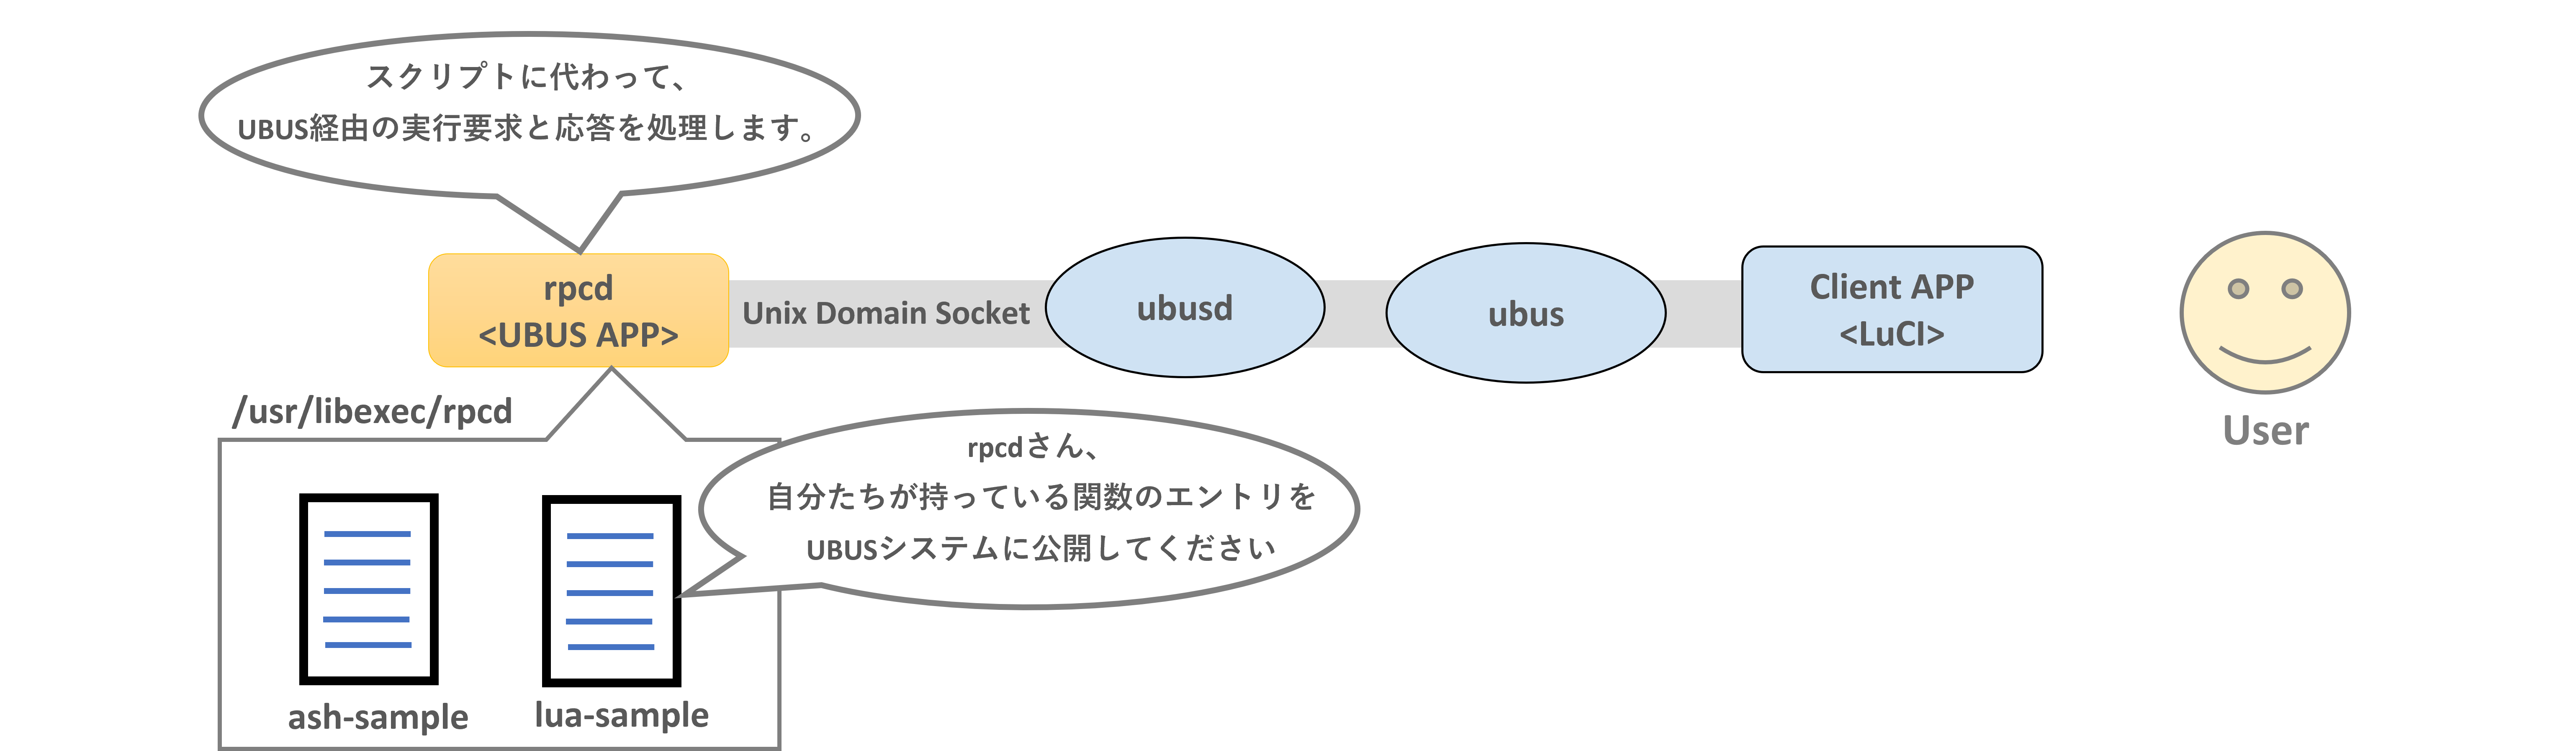
今回はプラグイン作成方法の1つ(※)として、UBUSシステムのサーバーアプリケーションである/sbin/rpcd(以下、rpcd)に自作したスクリプトを 読み込ませる方法について紹介します。
これによって、プロセス間通信機能(IPC)を持たない通常のスクリプトをUBUSシステム経由で実行でき、UBUSシステム のインタフェースをWebUIのLuCIに提供することでプラグインを実現することができます。
rpcdが読み込めるスクリプトは主にAshスクリプトとLuaスクリプトの2種類です。 これらのスクリプトはrpcdに正しく読み込んでもらうための記述ルールに則っている必要があります。
この記事では、これらスクリプトのrpcd読み込み用テンプレートを紹介し、実際に動作するサンプルコードを作成していきます。
この記事を読んで恩恵がある読者は以下のような方です。
興味があれば、ご参考ください。
もう1つのプラグイン作成方法はC言語によるUBUSサーバーアプリケーション開発です。デバイスドライバーと 直接的な情報のやり取りをしたいときなどはこちらの方法でプラグインを作る必要があります。しかし、実装難易度は高めです。
本記事の関連として以下の記事があります。実装難易度を3段階に分けて紹介しています。
この記事は以下の環境で実施した結果を元に作成しています。
この記事で紹介するプラグインの作成と追加方法に関して、機種依存はありません。 この記事ではRaspberry Pi3BをOpenWrtデバイスとしていますが、どんなデバイスでもOKです。(※ただし、LuCIと上記の依存パッケージがインストールされていることが前提です。)
記事内で紹介するコンソール表記は次の通りです。
user:~/openwrt$ command
root@OpenWrt:~# command
この記事で想定するOpenWrtデバイスの状態は、OpenWrtがインストールされた直後の初期状態です。
IPアドレスに着目すれば、OpenWrtデバイス自身は192.168.1.1/24のIPアドレスを持ち、192.168.1.0/24のネットワークを管理しています。
この記事で作成するLuCI用プラグインのデータは以下の2通りの方法で入手できます。
本記事のこちらを参照してください。
今回取り上げるLuCI用プラグイン一式は私のGitHubリポジトリにあります。 パッケージ作成に必要なMakefileも揃った完全版です。
一応、この記事の内容に沿って1つずつ作業をしていけば、このリポジトリにあるものと同じものが作成できます。
記述ミスなどで躓いたら、以下のリポジトリをダウンロードして手っ取り早く動作を確認してみてください。
この記事で作成するプラグインは以下の動画で紹介するものです。 インタフェース情報やUCI情報を取得するAshスクリプト(ash-sample)とLuaスクリプト(lua-sample)を作成し、それらのスクリプトの処理結果をJSONとしてブラウザー 側に提供して表示します。
内部構成としては、既存のOpenWrt環境の/usr/libexec/rpcdにプラグインとなるAshスクリプトとLuaスクリプトを追加しているだけです。 rpcdによって、これらのスクリプトをUBUS経由で実行することでインタフェース情報とUCI情報を取得します。
それでは、次節からプラグイン作成を始めましょう。
LuCI用プラグインを作成する前に開発準備をしましょう。
当然ですが、まずはOpenWrtデバイスを用意しましょう。一応、私の記事にはRaspberry Pi1~5を対象にOpenWrtファームウェア をインストールする方法を紹介していますので、良ければ参考にしてみてください。
なお今回、LuCI(WebUI)は依存モジュールとしてluci-compatとluci-lua-runtimeを利用しますので、メニューコンフィグの該当項目に チェックを入れてください。

APまたはルーター設定をした上で、LuCI画面またはコンソール上でluci-compatとluci-lua-runtimeを追加インストールしてください。 次はコンソール上でのインストール例です。
root@OpenWrt:~# opkg update
root@OpenWrt:~# opkg install luci-compat
root@OpenWrt:~# opkg install luci-lua-runtime <--- 正直、こちらは既にインストールされていると思います。
注意
OpenWrtデバイスのネットワーク接続が正常なのに上記のコマンド実行が失敗する場合、そのOpenWrtデバイス用のリポジトリに
そもそもluci-compatやluci-lua-runtimeが存在しない可能性があります。その場合はluci-compatとluci-lua-runtimeをプリインストールしたOpenWrtファームウェアイメージを
作成する必要があります。
ここではOpenWrtデバイスが初期状態であるとして、開発用PCとSSH接続するための 最低限の設定を紹介しています。もちろん、読者の方がすでにAPやルーター設定を実施しており、 Wi-Fiによる無線通信によりSSH接続が可能な場合はここはスキップしてOKです。
OpenWrtデバイスを用意できたら、次の図のようにLANケーブルでOpenWrtデバイスと開発用PCを繋いでください。
※図ではRaspberry PiがOpenWrtデバイスです。読者の方は、ご自身が持つOpenWrtデバイスとして置き換えてみてください。
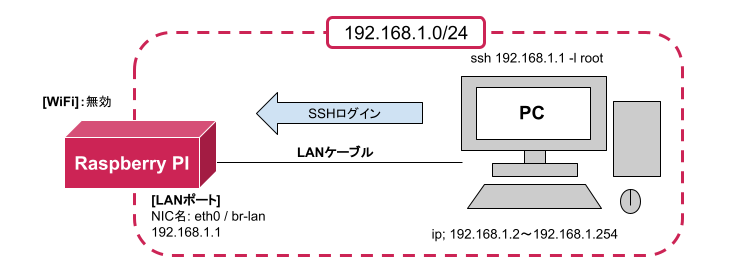
初期状態のOpenWrtデバイス(192.168.1.1/24)が管理するデフォルトのLANネットワークは192.168.1.0/24であり、SSHサーバーのdropbearが起動するようになっています。
また、SSHログインに必要な初期パスワード設定は無しのため、以下のコマンドを実行することでログインが成功します。
kamo@kamo:~$ ssh 192.168.1.1 -l root
次に、UbuntuやWindowsで利用可能なSCPコマンドについて使い方を押さえましょう。
SCPコマンドは作成したプラグイン(スクリプトやHTMLファイル)をOpenWrtデバイスに転送(アップロード)するために使用します。
OpenWrtをインストールしたばかりのデバイス条件では、次のようにSCPコマンドを実行することでファイル転送が可能です。
kamo@kamo:~$ touch test-file
kamo@kamo:~$ echo helloworld > test-file
kamo@kamo:~$ scp ./test-file root@192.168.1.1:/root
上記は、開発用PCのカレントディレクトリ内のtest-fileをOpenWrtデバイス(192.168.1.1/24)の/rootディレクトリに転送した例です
これだけ押さえておけば、ひとまず大丈夫かと思います。SCPコマンドについてもっと知りたい方はこちらを参照してみてください。
プラグインをSCPコマンドで転送して動作確認をする際に、LuCIのキャッシュ機能が最新Webページの表示を邪魔します。
そのため、LuCIのキャッシュ機能を表すUCIオプション(luci.ccache.enable)の値をOFFを示す0に変更してください。
root@OpenWrt:~# uci set luci.ccache.enable=0
root@OpenWrt:~# uci commit luci
root@OpenWrt:~# reboot
ここでは、プラグインの本体となるAsh(その1)とLuaスクリプト(その2)の2つを開発用PC上に作成します。
今回作成するAshスクリプトは特定インタフェースが持つIPアドレス、MACアドレスなどの情報を出力する簡単なものです。
ただし、実際にはAshスクリプトがプラグインのエントリーポイントとなり、その下で呼び出されるLuaスクリプト側でインタフェース情報の取得とJSON出力を実現します。
※実処理をLuaスクリプトに任せる理由は、コマンドライン引数として受け取ったパラメーターを元に外部コマンドを実行し、その結果をJSONに整形するのがLuaスクリプト の方がAshスクリプト単体の構成に比べて楽だからです。テーブルデータをJSONに整形してくれるLuCI用Luaモジュールを利用しています。
このAshスクリプトはUBUSサーバーアプリケーションのrpcdに読み込んでもらい、UBUSシステムに機能の公開を委譲します。 そのため、rpcdが読むことができる記述ルールでスクリプトを作成する必要があります。
rpcdが読み込めるAshスクリプトのテンプレートは次のOpenWrt公式ドキュメントに記載されています。
そのため、上記ページに記載された形式を守ったAshスクリプト(ash-sample)を書き、実処理のインタフェース情報の取得とJSON出力を実行するLuaスクリプト(for-ash-sample)を作成すると以下になります。
ash-sample
#!/bin/sh

case "$1" in
	list)
		echo '{ "hello": {}, "active_if_list": {}, "interface_ip4": {"ifname": "str" }, "interface_mac": {"ifname":"str"}}'
	;;
	call)
		case "$2" in
			hello)
				echo '{"reply":"Hello User!!!"}'
			;;
			active_if_list)
				interfaces=$(ip link show up | awk '/^[0-9]+: / {print substr($2, 1, length($2)-1)}')

				json="{\"interfaces\":["

				for iface in $interfaces; do
					json="${json}\"${iface}\","
				done

				json="${json%,}]}"

				echo $json
			;;
			interface_ip4)
				read input
				lua /usr/bin/for-ash-sample.lua "$2" "$input"
			;;
			interface_mac)
				read input
				lua /usr/bin/for-ash-sample.lua "$2" "$input"
			;;
		esac
	;;
	*)
		echo '{ "error": "Invalid Argument"}'
	;;
esac
for-ash-sample.lua
#!/usr/bin/env lua

local uci = require("luci.model.uci").cursor()
local json = require "luci.jsonc"

local execute = function(cmd)
    local handle = io.popen(cmd) --環境によっては実行できないこともあるそうです
    local result = handle:read('*a')
    handle:close()

    return result
end

if #arg ~= 2 then
    print('{ "error": { "reason": "No argument" }}')
    return
end

local method_param = json.parse(arg[2])

local data = {}

if arg[1] == 'interface_ip4' then
    cmd = "ifconfig " .. method_param.ifname .. " | sed -n 's/.*inet addr:\\([0-9\\.]*\\).*/\\1/p' | tr -d '\n'"
    data.addr = execute(cmd)
elseif arg[1] == 'interface_mac' then
    cmd =  "ifconfig " .. method_param.ifname .. " | awk '/HWaddr/ {print $5}' | tr -d '\n'"
    data.mac = execute(cmd)
end

if not next(data) then
    print('{ "error": { "reason": "no result" }}')
    return
end

local json_output = json.stringify(data, false)
print(json_output)
以上により、プラグイン本体(AshスクリプトとLuaスクリプト)の作成は完了です。
最後に、AshスクリプトをOpenWrt環境の/usr/libexec/rpcdに、Luaスクリプトを/usr/binにアップロードします。
kamo@kamo:~$ scp ./ash-sample root@192.168.1.1:/usr/libexec/rpcd
kamo@kamo:~$ scp ./for-ash-sample.lua root@192.168.1.1:/usr/bin
/usr/libexec/rpcdがOpenWrt環境になければ、root@OpenWrt:~# mkdir -p /usr/libexec/rpcd で作成してからSCPコマンドでアップロードしてください。ここに置いたAshスクリプトはUBUSのサーバーアプリケーションとして働く/sbin/rpcdに よって認識されます。rpcdがUBUSシステムにAshスクリプトのオブジェクト登録と外部要求に応じた公開機能実行などを代行してくれます。
/usr/binに存在する実行ファイルは、カレントディレクトリがどこであろうともファイル名だけで実行できるためです。 通常、インストールされた大半のアプリケーションは/usr/sbinまたは/usr/binに配置されるため、ユーザーがどのディレクトリに いようともファイル名だけ打ち込んでエンターを押せば起動できます。今回も実行ファイルはそれに倣っています。
無事にアップロードできたらスクリプトに実行権限を与え、バックエンドサーバーとなるrpcdを再起動します。
root@OpenWrt:~# chmod +x /usr/libexec/rpcd/ash-sample rpcdディレクトリが無いと言われたら、mkdirコマンドでrpcdディレクトリを作った後にもう一度上記のscpコマンドでアップロードすること
root@OpenWrt:~# chmod +x /usr/bin/for-ash-sample.lua
root@OpenWrt:~# service rpcd restart
これでプラグインを実行する準備が整いました。
上記コマンドの実行でプラグインがUBUSシステムに認識されると、次のlistコマンドでUBUSオブジェクトのash-sampleが 表示されるはずです。
それでは、動作確認をしてみます。
プラグインのスクリプト(/usr/libexec/rpcd/ash-sample)の名前がUBUSオブジェクトの名前になります。
root@OpenWrt:~# ubus list
ash-sample   <---私の環境では、ここに表示されました
container
dhcp
dnsmasq
dnsmasq.dns
file
hostapd
hotplug.dhcp
hotplug.ieee80211
hotplug.iface
hotplug.neigh
hotplug.net
hotplug.ntp
hotplug.tftp
iwinfo
log
luci
luci-rpc
network
network.device
network.interface
network.interface.lan
network.interface.loopback
network.rrdns
network.wireless
rc
service
session
system
uci
wpa_supplicant
次のコマンドを実行すると、呼び出し時の引数指定の方法が分かります。
root@OpenWrt:~# ubus -v list ash-sample
'ash-sample' @3e30ae5e
        "hello":{}
        "active_if_list":{}
        "interface_ip4":{"ifname":"String"}
        "interface_mac":{"ifname":"String"}
ここまでで特に問題がなければ、プラグインは正常にUBUSシステムに認識されていると言えます。 ということで、さっそくUBUSのcallコマンドを使用してプラグインを実行してみましょう。
以下はプラグインの実行結果です。
root@OpenWrt:~# ubus call ash-sample hello
{
        "reply": "Hello User!!!"
}
root@OpenWrt:~# ubus call ash-sample active_if_list
{
        "interfaces": [
                "lo",
                "eth0",
                "phy0-ap0",
                "br-lan"
        ]
}
root@OpenWrt:~# ubus call ash-sample interface_ip4 '{"ifname":"br-lan"}'
{
        "addr": "192.168.3.7"
}
root@OpenWrt:~# ubus call ash-sample interface_mac '{"ifname":"br-lan"}'
{
        "mac": "B8:27:EB:B8:6B:03"
}
これで動作確認ができました。
次はLuaスクリプトをプラグインのエントリーポイントとして、任意のUCIコンフィグの オプション・リスト情報を取得する処理を作成します。
このLUaスクリプトはUBUSサーバーアプリケーションのrpcdに読み込んでもらい、UBUSシステムに機能の公開を委譲します。 そのため、rpcdが読むことができる記述ルールでスクリプトを作成する必要があります。
rpcdが読み込めるLuaスクリプトのテンプレートは次のOpenWrtのGitHubページに記載されています。
上記URLのテンプレートをそのまま使っても良いのですが、今回はUCIコンフィグ(例:wireless)を指定すると その中のオプションとリストを表示するスクリプト(lua-sample)を書いてみました。
lua-sample
#!/usr/bin/env lua

local jsonc = require("luci.jsonc")
local uci = require("luci.model.uci").cursor()

local methods = {

    greeting = {
        call = function()
            local r = {}

            -- Write some process

            local data = {}
            data.reply1 = "good morning!!"
            data.reply2 = "Hello!!"
            data.reply3 = "good bye!!"

            r.result = jsonc.stringify(data)

            return r
        end
    },

    echo = {
        args = { arg = "a_string" },

        call = function(args)
            local r = {}

            -- Write some process

            r.result = jsonc.stringify({
                user_input = args.arg
            })

            return r
        end
    },

    config_detail = {
        args = { config = "a_string" },

        call = function(args)
            local r = {}
            local data = uci:get_all(args["config"])
            r.result = jsonc.stringify(data, false)
            return r
        end
    },
}

local function parseInput()

    local parse = jsonc.new()
    local done, err

    while true do
        local chunk = io.read(4096)
        if not chunk then
            break
        elseif not done and not err then
            done, err = parse:parse(chunk)
        end
    end

    if not done then
        print(jsonc.stringify({
            error = err or "Incomplete input for argument parsing"
        }))
        os.exit(1)
    end

    return parse:get()
end

-- validation
local function validateArgs(func, uargs)

    local method = methods[func]
    if not method then
        print(jsonc.stringify({error = "Method not found in methods table"}))
        os.exit(1)
    end

    local n = 0
    for _, _ in pairs(uargs) do n = n + 1 end

    if method.args and n == 0 then
        print(jsonc.stringify({
            error = "Received empty arguments for " .. func ..
                " but it requires " .. jsonc.stringify(method.args)
        }))
        os.exit(1)
    end

    uargs.ubus_rpc_session = nil

    local margs = method.args or {}
    for k, v in pairs(uargs) do
        if margs[k] == nil or (v ~= nil and type(v) ~= type(margs[k])) then
            print(jsonc.stringify({
                error = "Invalid argument '" .. k .. "' for " .. func ..
                    " it requires " .. jsonc.stringify(method.args)
            }))
            os.exit(1)
        end
    end

    return method
end

-- ubus list & call
if arg[1] == "list" then
    local _, rv = nil, {}
    for _, method in pairs(methods) do rv[_] = method.args or {} end
    print((jsonc.stringify(rv):gsub(":%[%]", ":{}")))
elseif arg[1] == "call" then
    local args = parseInput()
    local method = validateArgs(arg[2], args)
    local run = method.call(args)
    print(run.result)
    os.exit(run.code or 0)
end
以上により、プラグイン本体の作成は完了です。
最後に、Luaスクリプト(lua-sample)をOpenWrt環境の/usr/libexec/rpcdにアップロードします。
kamo@kamo:~$ scp ./lua-sample root@192.168.1.1:/usr/libexec/rpcd
無事にアップロードできたらスクリプトに実行権限を与え、バックエンドサーバーとなるrpcdを再起動します。
root@OpenWrt:~# chmod +x /usr/libexec/rpcd/lua-sample
root@OpenWrt:~# service rpcd restart
上記コマンドの実行でプラグインがUBUSシステムに認識されると、次のlistコマンドでUBUSオブジェクトのlua-sampleが 表示されるはずです。
/usr/libexec/rpcdに配置されていない、または実行権限が与えられていない、 依存モジュールのluci-compat、luci-lua-runtimeがインストールされていないなどの原因が考えられます。
root@OpenWrt:~# ubus list
ash-sample
container
dhcp
file
hostapd
hostapd.phy0-ap0
hotplug.dhcp
hotplug.ieee80211
hotplug.iface
hotplug.neigh
hotplug.net
hotplug.ntp
hotplug.tftp
iwinfo
log
lua-sample  <--- 私の環境では、ここに表示されました
luci
luci-rpc
network
network.device
network.interface
network.interface.lan
network.interface.loopback
network.rrdns
network.wireless
rc
service
session
system
test
uci
wpa_supplicant
そして、次のコマンドを実行すると、呼び出し時の引数指定の方法が分かります。
root@OpenWrt:~# ubus -v list lua-sample
'lua-sample' @45cb3627
        "echo":{"arg":"String"}
        "greeting":{}
        "config_detail":{"config":"String"}
ここまでで特に問題がなければ、プラグインは正常にUBUSシステムに認識されていると言えます。 ということで、さっそくUBUSのcallコマンドを使用してプラグインを実行してみましょう。
以下はプラグインの実行結果です。
root@OpenWrt:~# ubus call lua-sample greeting
{
        "reply2": "Hello!!",
        "reply3": "good bye!!",
        "reply1": "good morning!!"
}
root@OpenWrt:~# ubus call lua-sample echo '{"arg":"utakamo"}'
{
        "user_input": "utakamo"
}
root@OpenWrt:~# ubus call lua-sample config_detail '{"config":"wireless"}'
{
        "radio0": {
                "band": "2g",
                ".anonymous": false,
                "disabled": "0",
                "country": "JP",
                "txpower": "10",
                ".index": 0,
                "path": "platform/soc/3f300000.mmcnr/mmc_host/mmc1/mmc1:0001/mmc1:0001:1",
                "channel": "1",
                ".name": "radio0",
                ".type": "wifi-device",
                "htmode": "HT20",
                "type": "mac80211"
        },
        "default_radio0": {
                ".name": "default_radio0",
                ".anonymous": false,
                "ssid": "OpenWrt",
                "encryption": "psk2",
                "device": "radio0",
                ".index": 1,
                "key": "utakamo1234",
                "mode": "ap",
                ".type": "wifi-iface",
                "network": "lan"
        }
}
これで動作確認ができました。
LuCIのページ作成方法は前回記事の「OpenWrtアプリケーション開発 LuCI用カスタムページの作成と追加(難易度Lv1)」で紹介しましたので、 サクッと作っていきます。
作成するスクリプトは上記のプラグインをWeb経由からの要求に従って実行するmodule.lua、 そして、ユーザーが実際に操作するWebページ(sample_ash_plugin.htmとsample_lua_plugin.htm)の3つです。
ここではまず、index関数内で各プラグインのWebUI(Webページ)へのアクセスと、各プラグイン機能を実行するエントリポイントのルーティング設定が記述されています。
index関数内の指定によって、WebUIのアクセスとプラグイン機能実行がすべてWebブラウザー上のURL指定によって実現できます。 例えば、OpenWrtデバイスのIPアドレスが192.168.1.1の場合、以下のURLが利用できます。
| アクセス・実行対象 | 対応URL |
|---|---|
| Ashスクリプトのプラグインページ | https://192.168.1.1/cgi-bin/luci/admin/status/sample_ash_plugin |
| Luaスクリプトのプラグインページ | https://192.168.1.1/cgi-bin/luci/admin/status/sample_lua_plugin |
| Ashスクリプトのactive_if_list関数 | https://192.168.1.1/cgi-bin/luci/admin/status/sample_ash_plugin/active_if_list |
| Ashスクリプトのinterface_ip4関数 | https://192.168.1.1/cgi-bin/luci/admin/status/sample_ash_plugin/interface_ip4 |
| Ashスクリプトのinterface_mac関数 | https://192.168.1.1/cgi-bin/luci/admin/status/sample_ash_plugin/interface_mac |
| Luaスクリプトのconfig_detail関数 | https://192.168.1.1/cgi-bin/luci/admin/status/sample_lua_plugin/config_detail |
index関数以降はLuaスクリプトのUBUS CALLコマンド実装とそれを利用して呼び出されるプラグイン機能の実行関数が記述されています。
-- module.lua
module("luci.controller.luci-app-sample02.module", package.seeall)

function index()
    entry({"admin", "status", "sample_ash_plugin"}, template("luci-app-sample02/sample_ash_plugin"), _("Sample Ash Plugin"), 90)
    entry({"admin", "status", "sample_lua_plugin"}, template("luci-app-sample02/sample_lua_plugin"), _("Sample Lua Plugin"), 90)
    entry({"admin", "status", "sample_ash_plugin", "active_if_list"}, call("action_sample_ash_plugin_active_if_list"), nil).leaf = true
    entry({"admin", "status", "sample_ash_plugin", "interface_ip4"}, call("action_sample_ash_plugin_interface_ip4"), nil).leaf = true
    entry({"admin", "status", "sample_ash_plugin", "interface_mac"}, call("action_sample_ash_plugin_interface_mac"), nil).leaf = true
    entry({"admin", "status", "sample_lua_plugin", "config_detail"}, call("action_sample_lua_plugin"), nil).leaf = true
end

-- [References] https://openwrt.org/docs/techref/ubus#lua_module_for_ubus
function ubus_call(path, method, param)
    local ubus = require("ubus")
    local conn = ubus.connect()

    if not conn then
        return { error = "Unable to connect to ubus" }
    end

    local result, err = conn:call(path, method, param)
    conn:close()

    if not result then
        return { error = err or "ubus call failed" }
    end

    return result
end

function action_sample_ash_plugin_active_if_list()
    local luci_http = require "luci.http"

    -- ubus call
    local result = ubus_call("ash-sample", "active_if_list", {})

    luci_http.prepare_content("application/json")
    luci_http.write_json(result)
end

function action_sample_ash_plugin_interface_ip4()
    local luci_http = require "luci.http"

    -- Get parameters from the HTTP request
    local params = luci_http.formvalue("params")

    if not params then
        luci_http.prepare_content("application/json")
        luci_http.write_json({ error = "Missing params" })
        return
    end

    -- Create a parameter table for ubus call
    local json_param = { ifname = params }

    -- ubus call
    local result = ubus_call("ash-sample", "interface_ip4", json_param)

    luci_http.prepare_content("application/json")
    luci_http.write_json(result)
end

function action_sample_ash_plugin_interface_mac()
    local luci_http = require "luci.http"

    -- Get parameters from the HTTP request
    local params = luci_http.formvalue("params")

    if not params then
        luci_http.prepare_content("application/json")
        luci_http.write_json({ error = "Missing params" })
        return
    end

    -- Create a parameter table for ubus call
    local json_param = { ifname = params }

    -- ubus call
    local result = ubus_call("ash-sample", "interface_mac", json_param)

    luci_http.prepare_content("application/json")
    luci_http.write_json(result)
end

function action_sample_lua_plugin()
    local luci_http = require "luci.http"

    -- Get parameters from the HTTP request
    local params = luci_http.formvalue("params")

    if not params then
        luci_http.prepare_content("application/json")
        luci_http.write_json({ error = "Missing params" })
        return
    end

    -- Create a parameter table for ubus call
    local json_param = { config = params }

    -- ubus call
    local result = ubus_call("lua-sample", "config_detail", json_param)

    luci_http.prepare_content("application/json")
    luci_http.write_json(result)
end
以下はAshスクリプトで作ったプラグインを呼び出すことができるWebUIです。
Ajaxで以下のURLにアクセスし、結果をJSONとして取得して表示します。
※次のURLはOpenWrtデバイスが192.168.1.1の場合の例です。
| アクセス・実行対象 | 対応URL |
|---|---|
| Ashスクリプトのactive_if_list関数 | https://192.168.1.1/cgi-bin/luci/admin/status/sample_ash_plugin/active_if_list |
| Ashスクリプトのinterface_ip4関数 | https://192.168.1.1/cgi-bin/luci/admin/status/sample_ash_plugin/interface_ip4 |
| Ashスクリプトのinterface_mac関数 | https://192.168.1.1/cgi-bin/luci/admin/status/sample_ash_plugin/interface_mac |
<!-- sample_ash_plugin.htm -->
<%+header%>
<h1>Sample Ash Plugin</h1>

<!-- Active Interface List -->
<h2>Active Interface List</h2>
<div id="activeIfListResult">Loading...</div>

<!-- Form to fetch IPv4 address of an interface -->
<h2>Interface IPv4 Address</h2>
<form id="interfaceIp4Form">
    <label for="ip4Params">Interface Name:</label>
    <input type="text" id="ip4Params" name="params" required>
    <button type="submit">Show IPv4 Address</button>
</form>
<div id="interfaceIp4Result"></div>

<!-- Form to fetch MAC address of an interface -->
<h2>Interface MAC Address</h2>
<form id="interfaceMacForm">
    <label for="macParams">Interface Name:</label>
    <input type="text" id="macParams" name="params" required>
    <button type="submit">Show MAC Address</button>
</form>
<div id="interfaceMacResult"></div>

<script type="text/javascript">
    document.addEventListener('DOMContentLoaded', function() {
        // Fetch active interface list on page load
        var resultDiv = document.getElementById('activeIfListResult');
        resultDiv.innerHTML = 'Loading...'; // Show loading message

        fetch('<%=build_url("admin", "status", "sample_ash_plugin", "active_if_list")%>', {
            method: 'POST'
        })
        .then(response => response.json())
        .then(data => {
            displayInterfaceList('activeIfListResult', data);
        })
        .catch(error => {
            console.error('Error:', error);
            resultDiv.innerHTML = 'Error: ' + error;
        });
    });

    // Event listener for IPv4 address form
    document.getElementById('interfaceIp4Form').addEventListener('submit', function(event) {
        event.preventDefault();
        var params = document.getElementById('ip4Params').value;
        fetch('<%=build_url("admin", "status", "sample_ash_plugin", "interface_ip4")%>', {
            method: 'POST',
            headers: {
                'Content-Type': 'application/x-www-form-urlencoded'
            },
            body: new URLSearchParams({ params: params })
        })
        .then(response => response.json())
        .then(data => {
            displayResult('interfaceIp4Result', data);
        })
        .catch(error => {
            console.error('Error:', error);
            document.getElementById('interfaceIp4Result').innerHTML = 'Error: ' + error;
        });
    });

    // Event listener for MAC address form
    document.getElementById('interfaceMacForm').addEventListener('submit', function(event) {
        event.preventDefault();
        var params = document.getElementById('macParams').value;
        fetch('<%=build_url("admin", "status", "sample_ash_plugin", "interface_mac")%>', {
            method: 'POST',
            headers: {
                'Content-Type': 'application/x-www-form-urlencoded'
            },
            body: new URLSearchParams({ params: params })
        })
        .then(response => response.json())
        .then(data => {
            displayResult('interfaceMacResult', data);
        })
        .catch(error => {
            console.error('Error:', error);
            document.getElementById('interfaceMacResult').innerHTML = 'Error: ' + error;
        });
    });

    // Function to display active interface list in a table
    function displayInterfaceList(elementId, data) {
        var resultDiv = document.getElementById(elementId);
        resultDiv.innerHTML = ''; // Clear previous results

        var table = document.createElement('table');
        table.className = 'table'; // Use LuCI table CSS class

        var thead = document.createElement('thead');
        var headerRow = document.createElement('tr');
        headerRow.className = 'tr table-titles';

        var headers = ['Interface'];
        headers.forEach(function(text) {
            var th = document.createElement('th');
            th.className = 'th';
            th.appendChild(document.createTextNode(text));
            headerRow.appendChild(th);
        });
        thead.appendChild(headerRow);
        table.appendChild(thead);

        var tbody = document.createElement('tbody');
        data.interfaces.forEach(function(interfaceName) {
            var row = document.createElement('tr');
            row.className = 'tr';

            var cell = document.createElement('td');
            cell.className = 'td';
            cell.appendChild(document.createTextNode(interfaceName));
            row.appendChild(cell);

            tbody.appendChild(row);
        });
        table.appendChild(tbody);
        resultDiv.appendChild(table);
    }

    // Function to display result in a table
    function displayResult(elementId, data) {
        var resultDiv = document.getElementById(elementId);
        resultDiv.innerHTML = ''; // Clear previous results

        var table = document.createElement('table');
        table.className = 'table'; // Use LuCI table CSS class

        var thead = document.createElement('thead');
        var headerRow = document.createElement('tr');
        headerRow.className = 'tr table-titles';

        var headers = ['Key', 'Value'];
        headers.forEach(function(text) {
            var th = document.createElement('th');
            th.className = 'th';
            th.appendChild(document.createTextNode(text));
            headerRow.appendChild(th);
        });
        thead.appendChild(headerRow);
        table.appendChild(thead);

        var tbody = document.createElement('tbody');
        for (var key in data) {
            if (data.hasOwnProperty(key)) {
                var row = document.createElement('tr');
                row.className = 'tr';

                var keyCell = document.createElement('td');
                keyCell.className = 'td';
                keyCell.appendChild(document.createTextNode(key));
                row.appendChild(keyCell);

                var valueCell = document.createElement('td');
                valueCell.className = 'td';
                valueCell.appendChild(document.createTextNode(JSON.stringify(data[key])));
                row.appendChild(valueCell);

                tbody.appendChild(row);
            }
        }
        table.appendChild(tbody);
        resultDiv.appendChild(table);
    }
</script>
<%+footer%>
以下はLuaスクリプトで作ったプラグインを呼び出すことができるWebUIです。
Ajaxで以下のURLにアクセスし、結果をJSONとして取得してテーブル表示します。
※次のURLはOpenWrtデバイスが192.168.1.1の場合の例です。
| アクセス・実行対象 | 対応URL |
|---|---|
| Luaスクリプトのconfig_detail関数 | https://192.168.1.1/cgi-bin/luci/admin/status/sample_ash_plugin/config_detail |
<!-- sample_lua_plugin.htm -->
<%+header%>
<h1>Sample Lua Plugin</h1>
<form id="sampleForm">
    <label for="params">UCI CONFIG NAME:</label>
    <input type="text" id="params" name="params" required>
    <br>
    <button type="submit">Execute</button>
</form>
<div id="result"></div>

<script type="text/javascript">
    document.getElementById('sampleForm').addEventListener('submit', function(event) {
        event.preventDefault();
        var params = document.getElementById('params').value;

        fetch('<%=build_url("admin", "status", "sample_lua_plugin", "config_detail")%>', {
            method: 'POST',
            headers: {
                'Content-Type': 'application/x-www-form-urlencoded'
            },
            body: new URLSearchParams({ params: params })
        })
        .then(response => response.json())
        .then(data => {
            var resultDiv = document.getElementById('result');
            resultDiv.innerHTML = ''; // Clear previous results
            resultDiv.appendChild(generateTable(data));
        })
        .catch(error => {
            console.error('Error:', error);
            document.getElementById('result').innerHTML = 'Error: ' + error;
        });
    });

    function generateTable(data) {
        var table = document.createElement('table');
        table.className = "table"; // Use LuCI table CSS class

        // Create table header
        var thead = document.createElement('thead');
        var headerRow = document.createElement('tr');
        headerRow.className = "tr table-titles";
        ['Name', 'Type', 'Properties'].forEach(function(text) {
            var th = document.createElement('th');
            th.className = "th";
            th.appendChild(document.createTextNode(text));
            headerRow.appendChild(th);
        });
        thead.appendChild(headerRow);
        table.appendChild(thead);

        // Create table body
        var tbody = document.createElement('tbody');
        for (var key in data) {
            if (data.hasOwnProperty(key)) {
                var row = document.createElement('tr');
                row.className = "tr";

                // Name column
                var nameCell = document.createElement('td');
                nameCell.className = "td";
                nameCell.appendChild(document.createTextNode(key));
                row.appendChild(nameCell);

                // Type column
                var typeCell = document.createElement('td');
                typeCell.className = "td";
                typeCell.appendChild(document.createTextNode(data[key][".type"] || ''));
                row.appendChild(typeCell);

                // Properties column
                var propertiesCell = document.createElement('td');
                propertiesCell.className = "td";
                var propertiesTable = document.createElement('table');
                propertiesTable.className = "table"; // Use LuCI table CSS class

                for (var prop in data[key]) {
                    if (data[key].hasOwnProperty(prop) && prop !== '.name' && prop !== '.type') {
                        var propRow = document.createElement('tr');
                        propRow.className = "tr";
                        var propNameCell = document.createElement('td');
                        propNameCell.className = "td";
                        propNameCell.appendChild(document.createTextNode(prop));
                        var propValueCell = document.createElement('td');
                        propValueCell.className = "td";
                        propValueCell.appendChild(document.createTextNode(JSON.stringify(data[key][prop])));
                        propRow.appendChild(propNameCell);
                        propRow.appendChild(propValueCell);
                        propertiesTable.appendChild(propRow);
                    }
                }
                propertiesCell.appendChild(propertiesTable);
                row.appendChild(propertiesCell);

                tbody.appendChild(row);
            }
        }
        table.appendChild(tbody);

        return table;
    }
</script>
<%+footer%>
上記のスクリプトとファイルをOpenWrtデバイスに配置します。
最初に次のコマンドを実行してOpenWrtデバイスにディレクトリを作成します。
root@OpenWrt:~# mkdir -p /usr/lib/lua/luci/controller/luci-app-sample02
root@OpenWrt:~# mkdir -p /usr/lib/lua/luci/view/luci-app-sample02
そして、次のSCPコマンドで各スクリプトとファイルをOpenWrtデバイスの対象ディレクトリにアップロードします。
kamo@kamo:~$ scp ./module.lua root@192.168.1.1:/usr/lib/lua/luci/controller/luci-app-sample02
kamo@kamo:~$ scp ./sample_ash_plugin.htm root@192.168.1.1:/usr/lib/lua/luci/view/luci-app-sample02
kamo@kamo:~$ scp ./sample_lua_plugin.htm root@192.168.1.1:/usr/lib/lua/luci/view/luci-app-sample02
これでプラグインを実行するのに必要なものがすべて揃いました。
それでは動作確認をしてみます。
Ashスクリプトのプラグイン動作確認
まず、LuCIにアクセスにしてWebUIのトップページを開きます。
そして、上部メニューバーの「Status」を開き、「Sample Ash Plugin」をクリックします。
Ashスクリプトのプラグインページが遷移し、OpenWrtデバイスが認識しているインタフェースが テーブル表示されます。
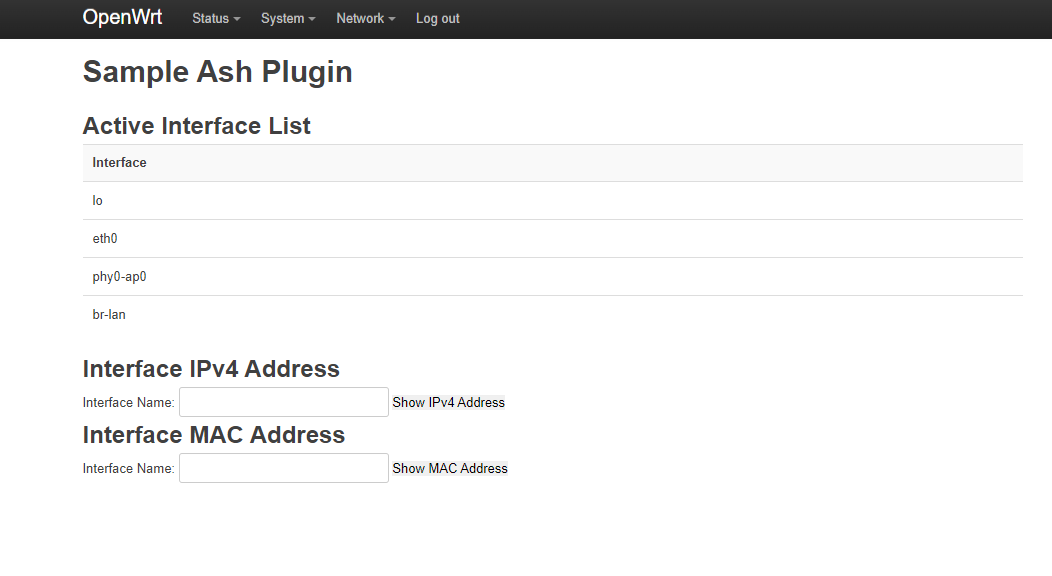
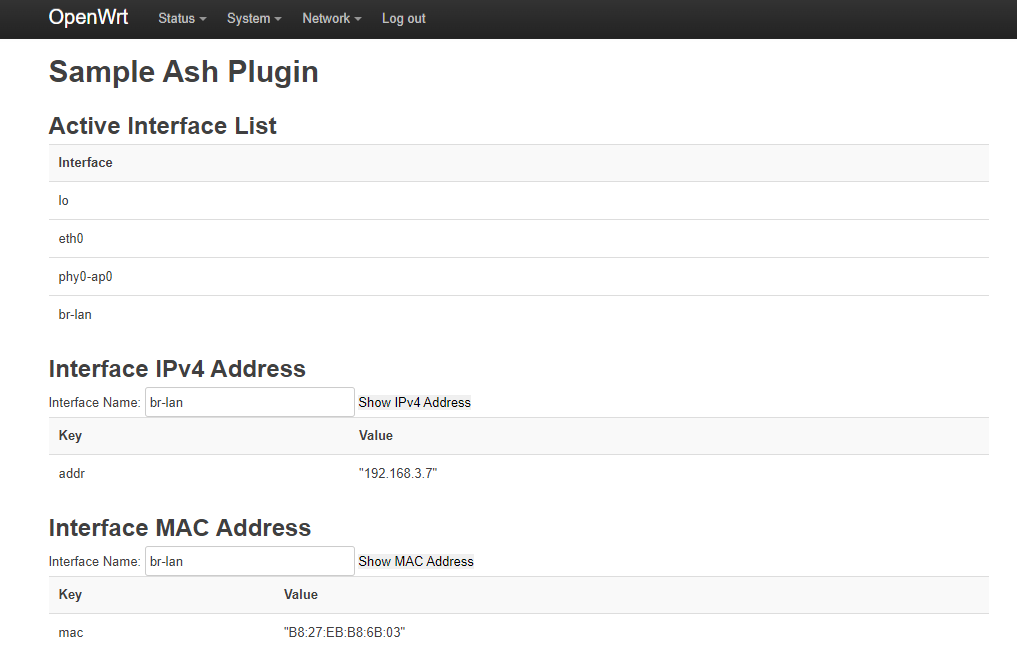
このテーブル表示の内容を参考に、次のIPアドレスとMACアドレスの照会フォームにインタフェースを入力して 「Show Ip Address」、「Show Mac Address」を押します。
すると、次のようにインタフェースが持つIPv4アドレスとMacアドレスが表示されます。 ※この時、存在しない場合はnoneと表示されます。
Luaスクリプトのプラグイン動作確認
LuCIのWebUIトップページを開き、上部メニューバーから「Status」--->「Sample Lua Plugin」をクリックします。
Luaスクリプトのプラグインページに遷移し、UCIコンフィグ名を入力するフォームが表示されます。
この入力フォームにOpenWrtデバイスが管理するUCIコンフィグの名前(例:network)を入力して、Showボタンを押します。
すると、次のようにnetworkコンフィグが持つ設定がテーブル表示されます。
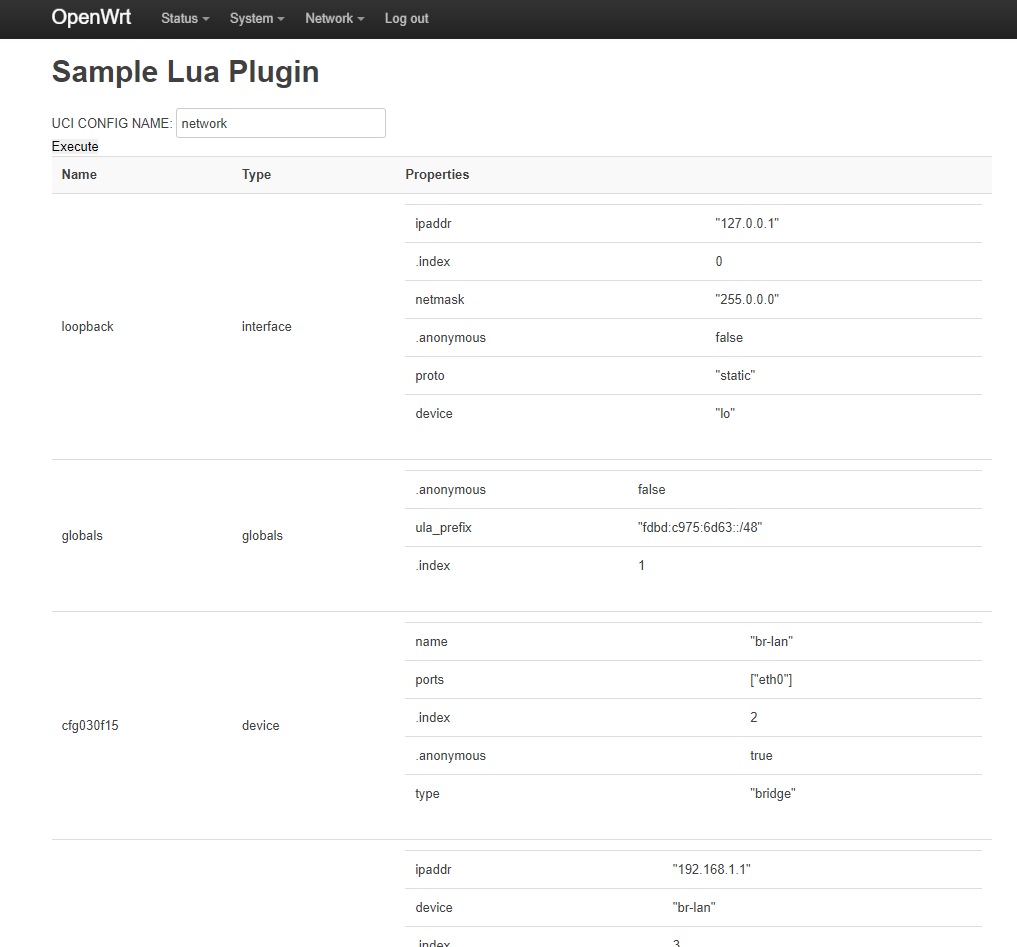
これで、プラグインの動作確認ができました。
今回作成したプラグインは、特定のハードウェアに依存したものではありません。
そのため、配布方法②で紹介するようなインストールパッケージを用意しなくてもOpenWrtデバイスに適用することができます。
ハードウェアに依存しないモジュールを配布する場合はここで紹介する方法も便利です。
それでは作成していきましょう。
前節で作成したプラグインを配布するために、まずはサーバーを用意します。
私の場合、GitHubでソース管理をしていますので、GitHubをサーバー代わりにします。
GitHubのリポジトリを作成し、プラグイン一式を収録したアーカイブファイルと それをダウンロードするスクリプト(セットアップスクリプト)をアップロードします。
今回、私は次のURLで示すGitHubリポジトリを用意しました。
https://github.com/utakamo/UtakamoStudyApps/raw/main/luci-plugin/luci-app-sample02/setup
このリポジトリに対して、次に説明するアーカイブファイルとセットアップスクリプトをアップロードしていきます。
最初に、各プラグイン用のLuaスクリプトとHTMLファイルを次のディレクトリ・ファイル構成になるように整理します。
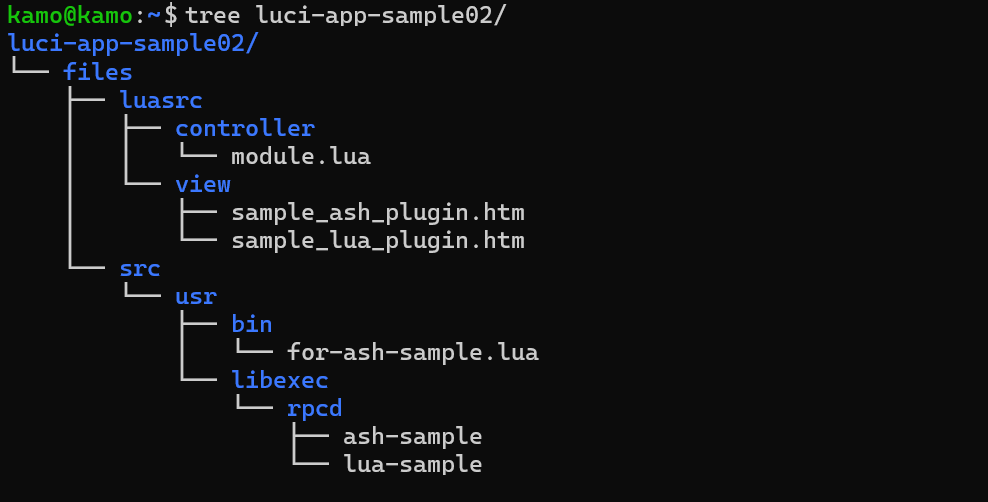
上記の構成からアーカイブファイルを作成するには、親のディレクトリを指定して次のコマンドを実行します。
kamo@kamo:~$ tar zcvf luci-app-sample02.tar.gz ./luci-app-sample02
./luci-app-sample02/
./luci-app-sample02/files/
./luci-app-sample02/files/src/
./luci-app-sample02/files/src/usr/
./luci-app-sample02/files/src/usr/libexec/
./luci-app-sample02/files/src/usr/libexec/rpcd/
./luci-app-sample02/files/src/usr/libexec/rpcd/lua-sample
./luci-app-sample02/files/src/usr/libexec/rpcd/ash-sample
./luci-app-sample02/files/src/usr/bin/
./luci-app-sample02/files/src/usr/bin/for-ash-sample.lua
./luci-app-sample02/files/luasrc/
./luci-app-sample02/files/luasrc/controller/
./luci-app-sample02/files/luasrc/controller/module.lua
./luci-app-sample02/files/luasrc/view/
./luci-app-sample02/files/luasrc/view/sample_lua_plugin.htm
./luci-app-sample02/files/luasrc/view/sample_ash_plugin.htm
作成できたアーカイブファイル(luci-sample02-app.tar.gz)は次で説明するセットアップスクリプトを使って展開し、 その中のファイルとスクリプトをOpenWrtデバイスの環境に配置します。
このアーカイブファイルは上記で説明したGitHubリポジトリにアップロードします。
これによって、このアーカイブは以下のURLでダウンロードが可能です。
https://github.com/utakamo/UtakamoStudyApps/raw/main/luci-plugin/luci-app-sample02/setup/luci-app-sample02.tar.gz
最後にセットアップスクリプトを作成します。
上記で作成したアーカイブファイルをOpenWrtデバイスのローカル環境にダウンロードして、 展開をした後に適切なディレクトリに各ファイルをコピーするだけの簡単なスクリプトです。
#/bin/sh
#setup-sample02

DOWNLOAD_URL="https://github.com/utakamo/UtakamoStudyApps/raw/main/luci-plugin/luci-app-sample02/setup/luci-app-sample02.tar.gz"
TEMP_ARCHIVE_1="/tmp/luci-app-sample02.tar.gz"
TEMP_ARCHIVE_2="/tmp/luci-app-sample02.tar"
EXTRACT_DIR="/tmp/luci-app-sample02"
WEBUI_SRC_DIR="$EXTRACT_DIR/files/luasrc"
WEBUI_DST_DIR="/usr/lib/lua/luci"
PLUGIN_SRC_DIR="$EXTRACT_DIR/files/src/"
PLUGIN_DST_DIR="/usr/libexec/rpcd"
USR_BIN_DIR="/usr/bin"

help() {
    echo "setup-sample02 install ... install luci-app-sample02"
    echo "setup-sample02 remove  ... remove luci-app-sample02"
}

delete_archive_file() {
    rm -rf "$TEMP_ARCHIVE_1"
    rm -rf "$TEMP_ARCHIVE_2"
    rm -rf "$EXTRACT_DIR"
}

remove_install_file() {
    rm -rf "$WEBUI_DST_DIR/view/luci-app-sample02/"
    rm -rf "$WEBUI_DST_DIR/controller/luci-app-sample02/"
}

install() {

    if ! opkg list-installed luci-compat | grep -q "luci-compat"; then
        echo -n "Do you want to install the luci-compat package? (Y/N) :"
        read reply

        if [ "$reply" = "Y" ]; then
            opkg update
            if ! opkg install luci-compat; then
                exit 1
            fi
        else
            echo "luci-app-sample02 install cancelled."
            exit 1
        fi
    fi

    # download
    wget --no-check-certificate -O "$TEMP_ARCHIVE_1" "$DOWNLOAD_URL"
    if [ "$?" -ne 0 ]; then
        echo "Failed to download $DOWNLOAD_URL" >&2
        exit 1
    fi

    # expands
    mkdir -p "$EXTRACT_DIR"
    gunzip -c "$TEMP_ARCHIVE_1" | tar -x -C /tmp

    if [ "$?" -ne 0 ]; then
    echo "Failed to extract $TEMP_ARCHIVE_1" >&2
    delete_archive_file
        exit 1
    fi

    # remove previous file for reinstall
    remove_install_file

    # create dir and copy
    mkdir -p "$WEBUI_DST_DIR/view/luci-app-sample02"
    mkdir -p "$WEBUI_DST_DIR/controller/luci-app-sample02"

    # plugin script
    mkdir -p "$PLUGIN_DST_DIR/"
    cp -a "$PLUGIN_SRC_DIR/usr/libexec/rpcd/ash-sample" "$PLUGIN_DST_DIR/"
    cp -a "$PLUGIN_SRC_DIR/usr/bin/for-ash-sample.lua" "$USR_BIN_DIR/"
    cp -a "$PLUGIN_SRC_DIR/usr/libexec/rpcd/lua-sample" "$PLUGIN_DST_DIR/"
    chmod +x "$PLUGIN_DST_DIR/ash-sample"
    chmod +x "$USR_BIN_DIR/for-ash-sample.lua"
    chmod +x "$PLUGIN_DST_DIR/lua-sample"

    # webui
    cp -a "$WEBUI_SRC_DIR/controller/module.lua" "$WEBUI_DST_DIR/controller/luci-app-sample02/"
    cp -a "$WEBUI_SRC_DIR/view/sample_ash_plugin.htm" "$WEBUI_DST_DIR/view/luci-app-sample02/"
    cp -a "$WEBUI_SRC_DIR/view/sample_lua_plugin.htm" "$WEBUI_DST_DIR/view/luci-app-sample02/"

    delete_archive_file
    echo "Setup completed successfully"

    echo -n "System Reboot? (Y/N) :"
    read reboot

    if [ "$reboot" = Y ]; then
        reboot
    fi
}

remove() {
    remove_install_file
    echo "Remove completed successfully"
}

if [ "$1" = "install" ]; then
        install
elif [ "$1" = "remove" ]; then
        remove
else
        help
fi
このセットアップスクリプトも作成後は、リポジトリにアップロードします。
そして、アップロードすると今回は以下のURLでダウンロードできるようになりました。
https://raw.githubusercontent.com/utakamo/UtakamoStudyApps/main/webui/luci-app-sample02/setup/setup-sample02
後はユーザーに、このセットアップスクリプトの使用方法をアナウンスすればいいだけです。
ということで、次はこのスクリプトを使ってOpenWrtデバイスのLuCIにプラグインを適用してみます。
それでは、実際にセットアップスクリプトをリポジトリから入手してプラグインを OpenWrtデバイスのLuCIに適用してみます。
プラグインを適用したいOpenWrtデバイスのコンソール上で次のコマンドを実行して、 セットアップスクリプト(setup-sample02)をダウンロードします。
root@OpenWrt~:# wget https://raw.githubusercontent.com/utakamo/UtakamoStudyApps/main/luci-plugin/luci-app-sample02/setup/setup-sample02
OpenWrtデバイス側でwgetコマンドを実行すると、SSL認証に失敗してダウンロードができない場合があります。 大体の原因は時刻情報なので、dateコマンドを実行して現在時刻が正しいか確認してください。
root@OpenWrt:~# date
システムが認識している現在時刻が正しくない場合は、次のコマンドでNTPサーバーから時刻を取得してください。
/etc/init.d/sysntpd restart
これでも、wgetコマンドでダウンロードできない場合は-no-check-certificateオプションを付けて実行してください。
wget --no-check-certificate https://raw.githubusercontent.com/utakamo/UtakamoStudyApps/main/luci-plugin/luci-app-sample02/setup/setup-sample02
次に、このセットアップスクリプトを実行します。
root@OpenWrt:~# chmod +x setup-sample02
root@OpenWrt~:# ./setup-sample02 install
Setup completed successfully
System Reboot? (Y/N) :Y
これでプラグインの適用が完了しました。
システムブート後にプラグインの各URLにアクセスしてみると、正常にページが表示されることが確認できます。
次のエラーが発生する場合、今回のプラグインの依存パッケージである luci-compatパッケージがお使いのデバイス用リポジトリに存在しないことが考えられます。
Unknown package 'luci-compat'.
Collected errors:
* opkg_install_cmd: Cannot install package luci-compat.
OpenWrtは様々なデバイス上で動作するOSですが、ハードウェア依存のあるアプリケーションパッケージはそのハードウェア用にビルドしなければなりません。 お使いのデバイスによっては、パッケージのビルドとリポジトリの更新が間に合っていない、そもそも止まっているなどの理由で欲しいパッケージ の情報がopkg updateで入手できない場合があります。
そのため、どうしてもインストールしたいパッケージがある場合は、ユーザーご自身が用意したPC(Linux)にOpenWrtのbuildrootを 構築し、インストールしたいパッケージを指定してビルドする必要があります。
ここでは、作成したカスタムページ(LuaスクリプトとHTMLファイル)を配布するために、 luci-app-sample02という名前でパッケージを作成してみます。
今回はハードウェアに依存するようなバイナリファイルはありませんので、ターゲットシステムを全て(all)にした上で パッケージを作成します。
それでは行ってみます。
ちなみに、この記事の内容で作成したパッケージは私のGitHub上で管理されていますので、 次のコマンド実行でインストール可能です。
root@OpenWrt:~# wget --no-check-certificate https://github.com/utakamo/UtakamoStudyApps/raw/refs/heads/main/luci-plugin/luci-app-sample02/setup/luci-app-sample02_1.0-r1_all.ipk
root@OpenWrt~:# opkg update
root@OpenWrt:~# opkg install luci-app-sample02_1.0-r1_all.ipk
インストール完了後に再起動すれば、プラグインが利用可能になります。
最初に、前節で作成した各カスタムページ用のLuaスクリプトとHTMLファイルを次のディレクトリ・ファイル構成になるように整理します。 ※以下の図にあるMakefileは次節で作成します。
上図のディレクトリ構成で各カスタムページが管理されているものとして、 パッケージ作成用のMakefileを記述します。
手順1で作成したUtakamoStudyApps/luci-plugin/luci-app-sample02直下に次のMakefileを作成します。
include $(TOPDIR)/rules.mk

PKG_NAME:=luci-app-sample02
PKG_VERSION:=1.0
PKG_RELEASE:=1

PLUGIN_SOURCE_DIR:=./files/src
LUA_SOURCE_DIR:=./files/luasrc

PLUGIN_DIR = /usr/libexec/rpcd
USR_BIN_DIR = /usr/bin
LUA_LIBRARYDIR = /usr/lib/lua
LUCI_LIBRARYDIR = $(LUA_LIBRARYDIR)/luci
LUCI_MODULEDIR = $(LUCI_LIBRARYDIR)/controller
LUCI_VIEWDIR = $(LUCI_LIBRARYDIR)/view


include $(INCLUDE_DIR)/package.mk

define Package/luci-app-sample02
    CATEGORY:=utakamo
    SECTION:=utakamo
    TITLE:=luci sample application
    DEPENDS:=+luci-compat
    PKGARCH:=all
endef

define Build/Compile
endef

define Package/luci-app-sample02/install
    $(INSTALL_DIR) $(1)$(PLUGIN_DIR)
    $(INSTALL_BIN) $(PLUGIN_SOURCE_DIR)/usr/libexec/rpcd/ash-sample $(1)$(PLUGIN_DIR)
    $(INSTALL_BIN) $(PLUGIN_SOURCE_DIR)/usr/libexec/rpcd/lua-sample $(1)$(PLUGIN_DIR)
    $(INSTALL_DIR) $(1)$(USR_BIN_DIR)
    $(INSTALL_BIN) $(PLUGIN_SOURCE_DIR)/usr/bin/for-ash-sample.lua $(1)$(USR_BIN_DIR)
    $(INSTALL_DIR) $(1)$(LUCI_MODULEDIR)/luci-app-sample02
    $(INSTALL_DATA) $(LUA_SOURCE_DIR)/controller/module.lua $(1)$(LUCI_MODULEDIR)/luci-app-sample02
    $(INSTALL_DIR) $(1)$(LUCI_VIEWDIR)/luci-app-sample02
    $(INSTALL_DATA) $(LUA_SOURCE_DIR)/view/sample_ash_plugin.htm $(1)$(LUCI_VIEWDIR)/luci-app-sample02
    $(INSTALL_DATA) $(LUA_SOURCE_DIR)/view/sample_lua_plugin.htm $(1)$(LUCI_VIEWDIR)/luci-app-sample02
endef

define Package/luci-app-sample02/postinst
#!/bin/sh
echo "Successfully installed!! Please reboot the system." >&2
exit 0
endef

$(eval $(call BuildPackage,luci-app-sample02))
今回のMakefileはコンパイルが必要なソースファイルは含みませんので、define Build/Compileの文は空の状態です。 (もし、コンパイルしなければ行けないC言語ソースファイルがある場合はターゲットシステムを全て(all)にしてパッケージを作成することは得策ではありません。)
define Package/luci-app-sample02/installの文は、各ファイルをインストール先のOpenWrtデバイス環境と対になったパッケージ環境($(1) にコピーする処理です。
これで手順1で各ディレクトリの中に格納したHTMLファイルやLuaスクリプトが、$(1)で示されるパッケージ環境 の各ディレクトリ階層に配置されるようになります。
今回作成するパッケージの中身はスクリプトのため、特定のアーキテクチャやシステム、ハードウェアに依存したものではありません。 そのため、パッケージのターゲットシステムをallにしておいた方が便利です。
パッケージのターゲットシステムをallにするには、上記Makefileに記載されている通り、PKGARCH:=all の文を記述します。
次は、上記で作成したパッケージ作成用のMakefileをOpenWrtのbuildrootにfeed情報としてインストールしてビルドします。
まず、カスタムページ(Luaスクリプト・HTMLファイル)とMakefileを格納したディレクトリの親ディレクトリである UtakamoStudyAppsまでのフルパスを~/openwrt/feeds.confの内容として以下のように記述します。
kamo@kamo:~/openwrt$ nano feeds.conf
# feeds.confの記載例
# パッケージパスはご自身の環境を確認の上、記述してください
# src-link [フィード名] [パッケージパス]
src-link utakamo /home/kamo/UtakamoStudyApps
次に、以下のコマンドでbuildrootでカスタムページのMakefileを読み込ませ、utakamo feed情報としてインストールします。
kamo@kamo:~/openwrt$./scripts/feeds update -a
kamo@kamo:~/openwrt$./scripts/feeds install -a -p utakamo
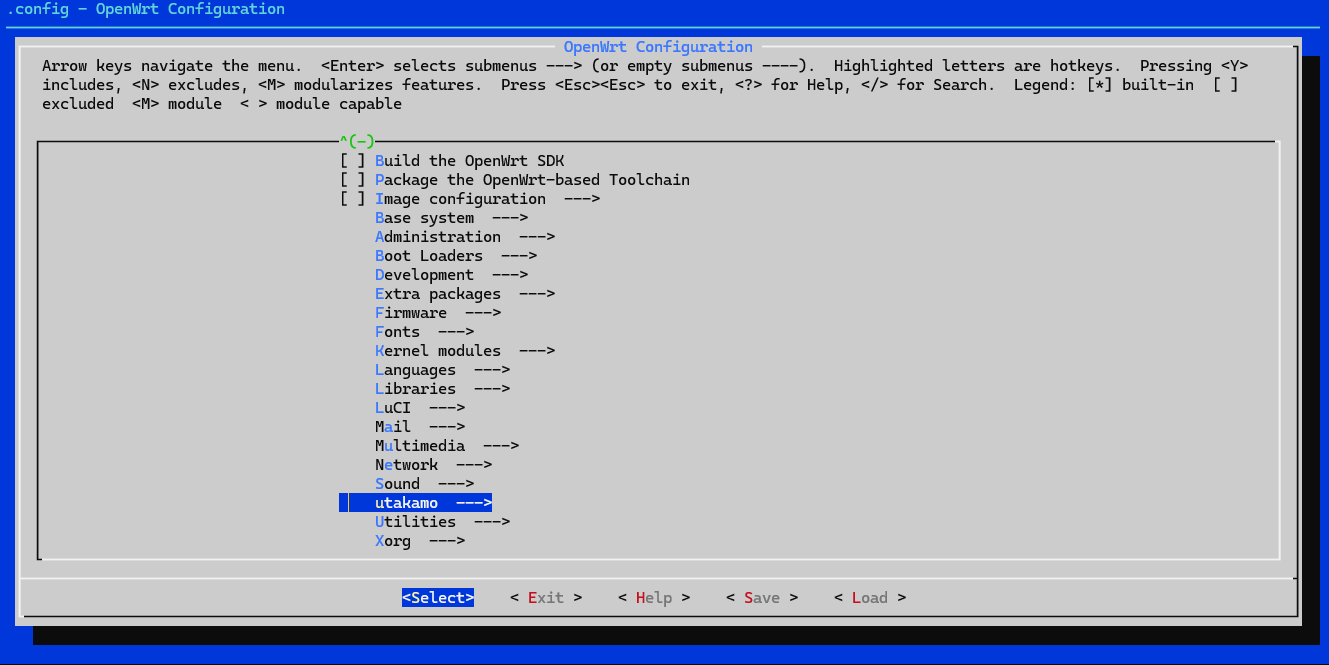
正常にfeed情報がインストールできたら、make menuconfigで設定画面を表示します。
kamo@kamo:~/openwrt$ make menuconfig
一覧の中に「utakamo」という項目がありますので、これを選択します。
すると、「utakamo」の中に今回作成したLuCIのカスタムページ用パッケージの「luci-app-sample02」がありますので、これにチェックを入れます。
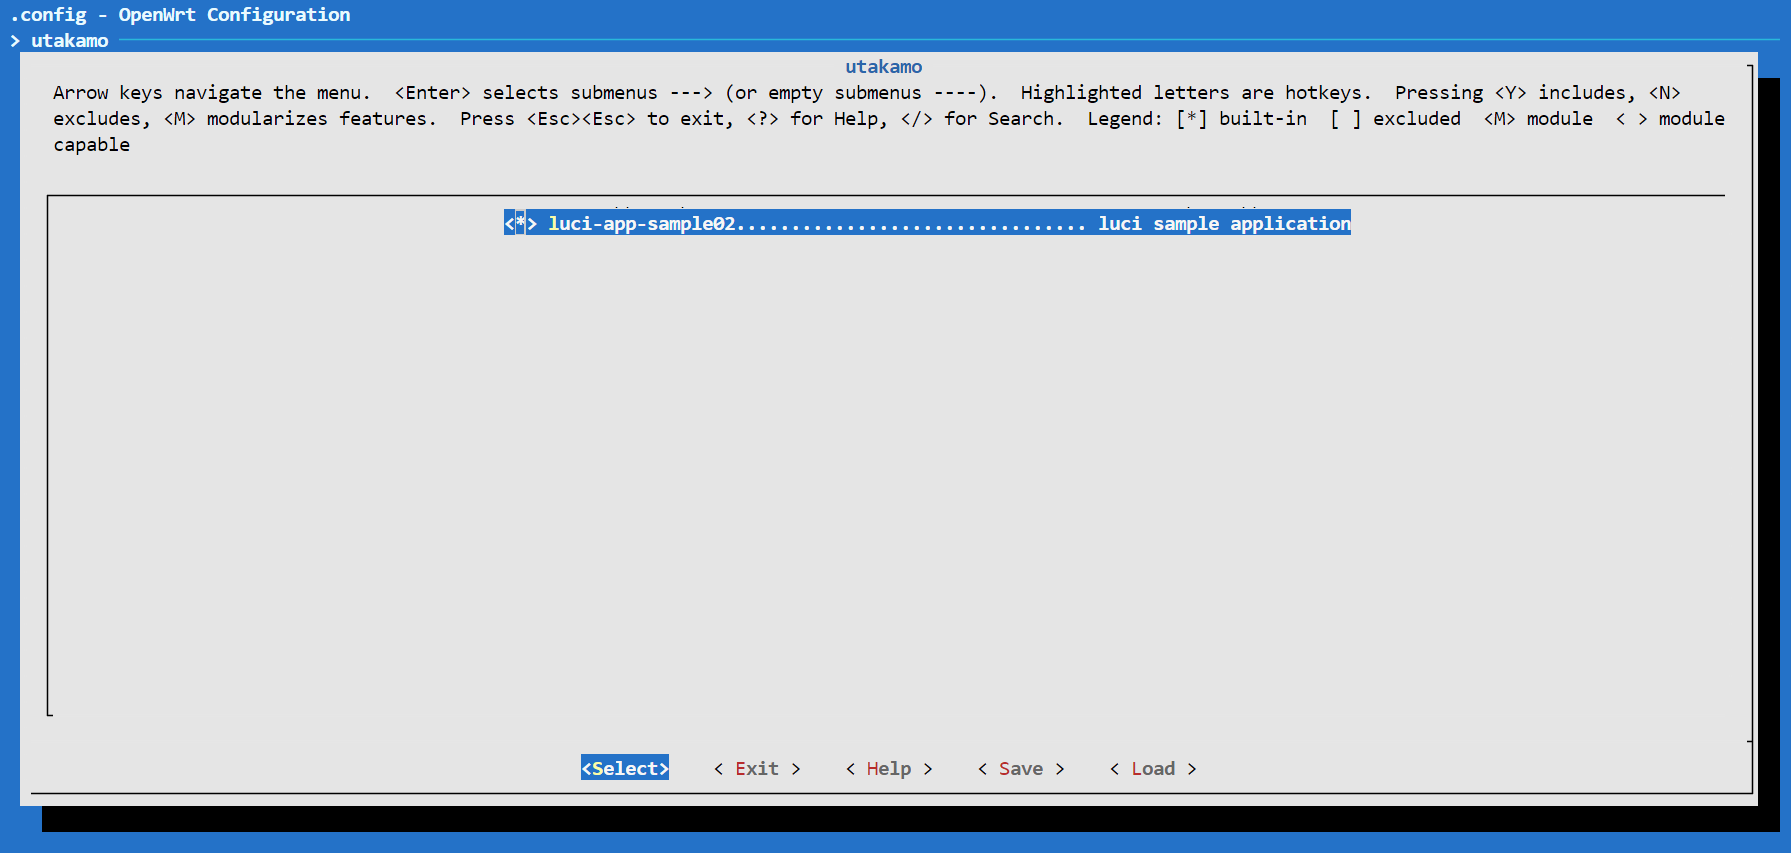
その後、変更を保存して設定画面(メニューコンフィグ)を終了します。※Exitを選択すると、終了する前に変更内容を保存するか聞かれますので「YES」を選んでください。
コンソールに操作が戻ってきますので、次のMakeコマンドでluci-app-sample02パッケージを作成してください。
kamo@kamo:~/openwrt$ make package/luci-app-sample02/compile
正常にパッケージ作成が完了すると、openwrt/bin/packages/<chip name>/utakamoに作成されたパッケージ本体(.ipk)があります。 ※今回は全ターゲットシステム向けのパッケージを作成しましたので、luci-app-sample02_1.0-r1_all.ipkという名前でパッケージが出来上がりました。
kamo@kamo:~/openwrt/bin/packages/aarch64_cortex-a53/utakamo$ ls
Packages                                        Packages.gz
Packages.manifest                               Packages.sig
index.json                                      luci-app-sample02_1.0-r1_all.ipk
これでパッケージ作成は完了です。
上記で作成したパッケージをOpenWrtデバイスに転送してインストールします。
SCPコマンドを次のように使用することで、はOpenWrtデバイスに転送できます。 ※もちろん、いろいろなファイル転送のいづれかで作成したパッケージをOpenWrtデバイス環境に転送することができればOKです。
kamo@kamo:~/openwrt/bin/packages/aarch64_cortex-a53/utakamo$ scp ./luci-app-sample02_1.0-r1_all.ipk root@192.168.1.1:/root
OpenWrtデバイスにパッケージを転送後、OpenWrtのコンソール上で次のコマンドを実行することでインストールします。
root@OpenWrt~:# opkg update <--- luci-app-sample02はluci-compatを依存パッケージとするので、その情報を確実にシステム認識させるためにupdateを実行します。
root@OpenWrt~:# opkg install luci-app-sample02_1.0-r1_all.ipk
以上で、 自作スクリプトと連携するLuCI用プラグインの作成と追加からパッケージ作成についても紹介しました。
次のエラーが発生する場合、今回のサンプルパッケージ(luci-app-sample02)の依存パッケージである luci-compatパッケージがお使いのデバイス用リポジトリに存在しないことが考えられます。
root@OpenWrt:~# opkg install luci-app-sample02_1.0-r1_all.ipk
Unknown package 'luci-app-sample02'.
Collected errors:
* pkg_hash_check_unresolved: cannot find dependency luci-compat for luci-app-sample02
* pkg_hash_fetch_best_installation_candidate: Packages for luci-app-sample02 found, but incompatible with the architectures configured
* opkg_install_cmd: Cannot install package luci-app-sample02.
OpenWrtは様々なデバイス上で動作するOSですが、ハードウェア依存のあるアプリケーションパッケージはそのハードウェア用にビルドしなければなりません。 お使いのデバイスによっては、パッケージのビルドとリポジトリの更新が間に合っていない、そもそも止まっているなどの理由で欲しいパッケージ の情報がopkg updateで入手できない場合があります。
そのため、どうしてもインストールしたいパッケージがある場合は、ユーザーご自身が用意したPC(Linux)にOpenWrtのbuildrootを 構築し、インストールしたいパッケージを指定してビルドする必要があります。
今回はOpenWrtのLuCI用プラグインの作成方法について紹介しました。
この記事では、UCIコンフィグの情報を取得するだけの簡単なプラグインを作った だけですが、もっと有用な処理をすれば、便利なプラグインとして他のユーザーに 重宝されるかもしれません。
作りたい機能がある方は、実装の際に参考にしてみてください。

Thunderboltとは何か? パソコン購入前に知っておきたいポイントを整理
Thunderboltとは何かを、パソコン購入を検討している人向けに整理します。Thunderbolt 4と5の違い、USB4との関係、製品ページで確認したいポイントをまとめています。

PCストレージ規格を解説! 現行の主流から旧規格まで
PCストレージ規格の基本を整理します。SATAとNVMeの違い、PCIe世代、M.2や2.5インチなどの形状、外付けストレージ規格、HDDとSSDの違い をまとめています。
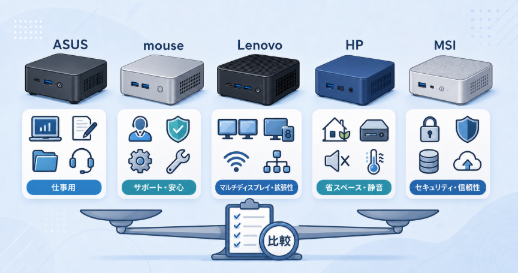
信頼性が売り! 大手・老舗PCメーカーが販売するミニPC 5選
ASUS、マウスコンピューター、Lenovo、HP、MSIから、Amazonで購入できるミニPC5機種を紹介します。CPU、メモリ、ストレージ、拡張性、保証、無線LANの有無を用途別に整理します。

OCuLinkとは何か? 小型PCやミニPCの購入前に知っておきたいポイントを整理
OCuLinkとは何かを、小型PCやミニPCの購入を検討している人向けに整理します。USB4やThunderboltとの違い、eGPU用途で気にしたいポイント、製品ページでの確認点をまとめています。

ハンドヘルドゲーミングPCとは何か? 代表メーカーと製品を紹介
ハンドヘルドゲーミングPCとは何かを整理し、Steam Deck OLED、ROG Xbox Ally X、Lenovo Legion Go、MSI Claw A1Mなど代表的なメーカー と製品

初心者向けノートパソコンおすすめ10選 失敗しにくい選び方を整理
ノートパソコンを初めて選ぶ人向けに、比較しやすい10機種を紹介します。メモリ、ストレージ、画面サイズ、重さ、Office有無、保証の見方を整理します。