2026年版 ロボット掃除機の選び方 おすすめモデル5選
ロボット掃除機の選び方を、吸引力、水拭き、マッピング、全自動ステーション、障害物回避から整理し、代表メーカーとモ デルを紹介します。

この記事では、UCIコンフィグレーションファイルを操作するためのUCIコマンドの使い方について紹介します。
主な内容はOpenWrt公式ドキュメントでも紹介されていますので、その補足としてお読みください。
ここでは、まずUCIコンフィグレーションファイルの構造を説明してから各UCIコマンドの詳細な使い方を紹介します。
なお、UCIコンフィグレーションファイルを管理するUCIシステムの全体的な理解については 第3回 OpenWrt開発入門 UCIコマンドによるネットワーク・Wi-Fi設定 ― UCIシステムの仕組みを参照して下さい。
それでは、行きます。
UCIコンフィグレーションファイルには、以下の3つの構成要素が存在します。
それぞれの構成要素が持つ役割について説明します。

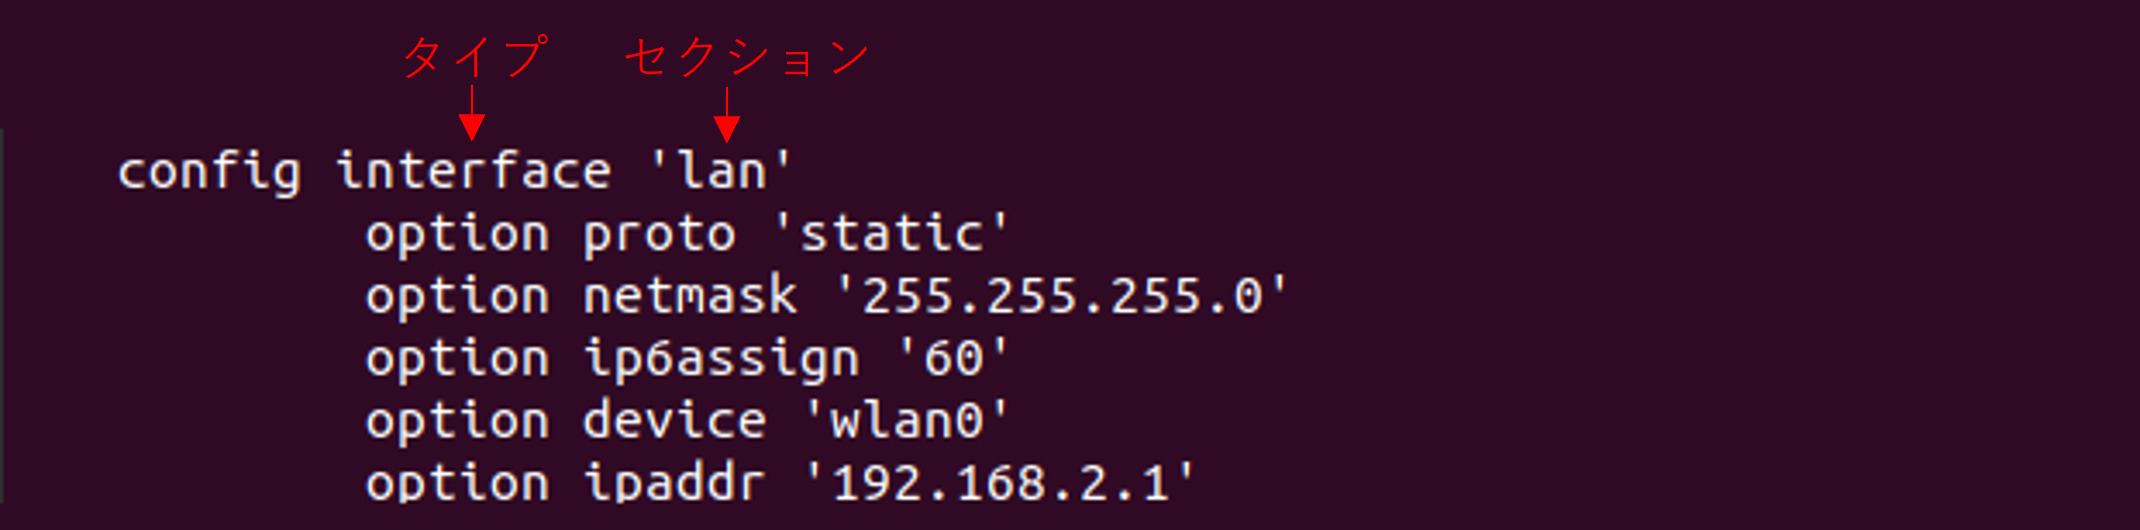
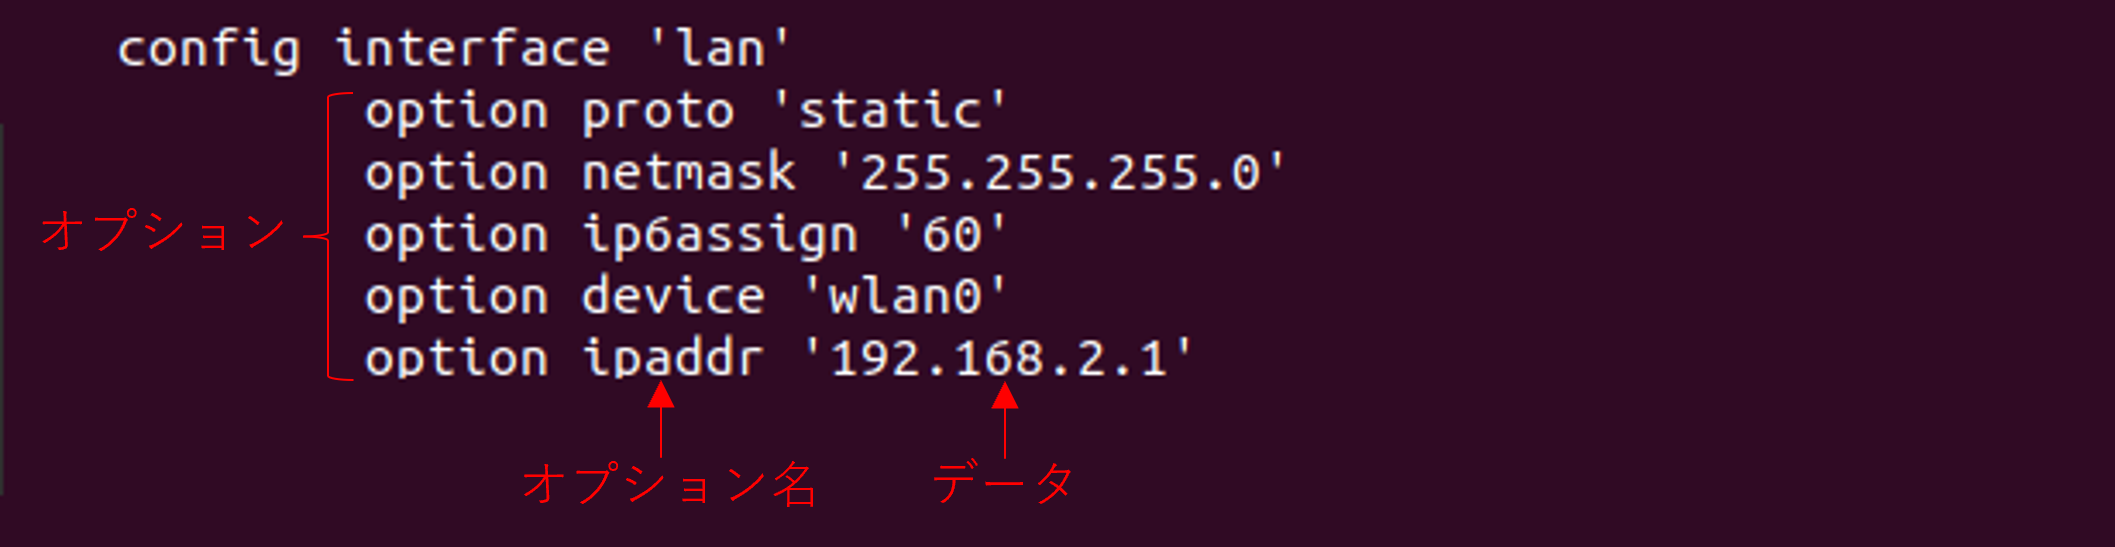
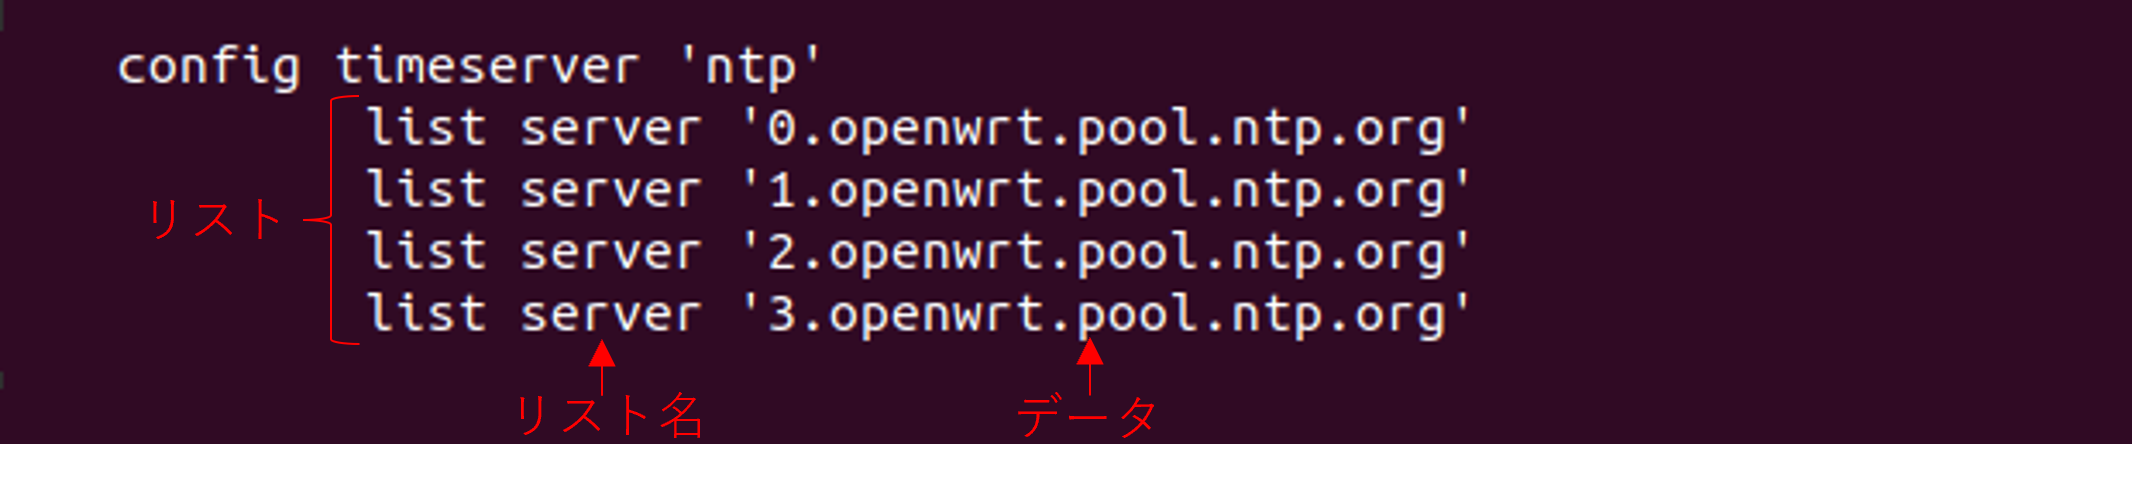
UCIコンフィグレーションファイルでは、2つのパラメータ表記方法としてHuman-friendly表記とProgrammable表記があります。
root@OpenWrt:~# cat /etc/config/dropbear
config dropbear
    option PasswordAuth 'on'
    option RootPasswordAuth 'on'
    option Port '22'
root@OpenWrt:~# uci show dropbear
dropbear.@dropbear[0]=dropbear
dropbear.@dropbear[0].PasswordAuth='on'
dropbear.@dropbear[0].RootPasswordAuth='on'
dropbear.@dropbear[0].Port='22'
前々節で紹介したセクションには、名前付きセクションと匿名セクションの2つが存在します。
Human-friendly表記
root@OpenWrt:~# cat /etc/config/network
config interface 'loopback'  <--セクション名はloopbackです
    option device 'lo'
    option proto 'static'
    option ipaddr '127.0.0.1'
    option netmask '255.0.0.0'
.....省略

config interface 'lan'  <--セクション名はlanです
    option proto 'static'
    option netmask '255.255.255.0'
    option ip6assign '60'
    option device 'wlan0'
    option ipaddr '192.168.2.1'
.....省略
Programmable表記
root@OpenWrt:~# uci show network.loopback
network.loopback=interface  <--セクション名はloopbackです
network.loopback.device='lo'
network.loopback.proto='static'
network.loopback.ipaddr='127.0.0.1'
network.loopback.netmask='255.0.0.0'
root@OpenWrt:~# uci show network.lan
network.lan=interface  <--セクション名はlanです
network.lan.proto='static'
network.lan.netmask='255.255.255.0'
network.lan.ip6assign='60'
network.lan.device='wlan0'
network.lan.ipaddr='192.168.2.1'
Human-friendly表記

root@OpenWrt:~# cat /etc/config/network

.....省略
config device  <--匿名セクションは何も表示されません
option name 'br-lan'
option type 'bridge'
list ports 'eth0'
.....省略
Programmable表記その1
root@OpenWrt:~# uci show network
.....省略
network.@device[0]=device  <--匿名セクションは「@+タイプ名+インデックス」の仮の名前を与えられます
network.@device[0].name='br-lan'
network.@device[0].type='bridge'
network.@device[0].ports='eth0'
.....省略
Programmable表記その2
root@OpenWrt:~# uci show network.@device[0]
.....省略
network.cfg030f15=device  <--「@+タイプ名+インデックス」の代わりに「cfg+uid」形式で表示されます
network.cfg030f15.name='br-lan'
network.cfg030f15.type='bridge'
network.cfg030f15.ports='eth0'
.....省略
上記の説明を裏付ける関数の1つとして、Luaスクリプト用UCI関数のget_first関数があります。
ここまでの説明で、UCIコマンドの引数の指定方法が分ってきます。
以下はUCIコマンドのヘルプ画面に表示される説明を並べたものです。
個別のコマンドの詳細については、次節を確認してください。
| UCIコマンド | 引数フォーマット | 用途 |
|---|---|---|
| show | [<config>[.<section>[.<option>]]] | コンフィグ、セクション、タイプ、オプションの値を表示します。 |
| get | <config>.<section>[.<option>]=<value> | 指定セクションのタイプ情報、オプション値を取得します。 |
| set | <config>.<section>[.<option>]=<value> | 指定した設定ファイル、セクション、オプションの値を変更します。 |
| add_list | <config>.<section>.<option>=<string> | セクションのリストを追加します。 |
| add | <config> <section-type> | 新しい匿名セクションを追加します。 |
| delete | <config>.<section>[.<option>] | 指定した設定ファイル、セクション、オプションを削除します。 |
| del_list | <config>.<section>.<option>=<string> | セクションのリストを削除します。 |
| commit | [<config>] | 変更を反映させるために使用します。 |
| revert | <config>[.<section>[.<option>]] | 変更を破棄して元に戻すために使用します。 |
| changes | [<config>] | 変更点を表示します。 |
| rename | <config>.<section>[.<option>]=<name> | 設定ファイル、セクション、オプションの名前を変更します。 |
| reorder | <config>.<section>=<position> | セクションの順序を変更します。 |
| export | [<config>] | 指定された設定ファイルをファイルにエクスポートします。 |
| import | [<config>] | 指定されたファイルから設定をインポートします。 |
| batch | 複数のUCIコマンドをバッチ処理します。 |
showコマンドは、指定UCIコンフィグレーションファイルのパラメーターをProgrammable表記で標準出力します。
このコマンドは、指定のUCIコンフィグレーションファイルに対応するステージング領域 (/tmp/.uci) とFLASH領域 (/etc/config) のマージ結果を表示します。 つまり、このコマンドの出力は、実際にOpenWrtが使用する設定値です。
uci show
root@OpenWrt:~# uci show
dhcp.odhcpd.maindhcp='0'
dhcp.odhcpd.leasefile='/tmp/hosts/odhcpd'
dhcp.odhcpd.leasetrigger='/usr/sbin/odhcpd-update'
dhcp.odhcpd.loglevel='4'
dropbear.@dropbear[0]=dropbear
dropbear.@dropbear[0].PasswordAuth='on'
dropbear.@dropbear[0].RootPasswordAuth='on'
dropbear.@dropbear[0].Port='22'
firewall.@defaults[0]=defaults
firewall.@defaults[0].syn_flood='1'
firewall.@defaults[0].input='ACCEPT'
firewall.@defaults[0].output='ACCEPT'
.....省略
uci show <config>
root@OpenWrt:~# uci show network
network.loopback=interface
network.loopback.device='lo'
network.loopback.proto='static'
network.loopback.ipaddr='127.0.0.1'
network.loopback.netmask='255.0.0.0'
network.globals=globals
network.globals.ula_prefix='fdd6:3a80:bcd9::/48'
network.@device[0]=device
network.@device[0].name='br-lan'
network.@device[0].type='bridge'
network.@device[0].ports='eth0'
.....省略
uci show <config>.<section>
root@OpenWrt:~# uci show network.lan
network.lan=interface
network.lan.proto='static'
network.lan.netmask='255.255.255.0'
network.lan.ip6assign='60'
network.lan.ipaddr='192.168.4.1'
network.lan.device='wlan0'
root@OpenWrt:~# uci show network.@device[0]
network.cfg030f15=device
network.cfg030f15.name='br-lan'
network.cfg030f15.type='bridge'
network.cfg030f15.ports='eth0'
uci show <section>.<section>.<option>
root@OpenWrt:~# uci show network.lan.proto
network.lan.proto='static'
root@OpenWrt:~# uci show network.@device[0].name
network.cfg030f15.name='br-lan'
setコマンドは、指定されたセクションやパラメーターを変更または追加し、その結果をステージング領域である/tmp/.uciに保存します。
一般的に、その後にcommitコマンドを実行することで、ステージング領域(/tmp/.uci/)の内容がFLASH領域(/etc/config/)の対応する UCIコンフィグレーションファイルにコピー(マージ)されます。
ただし、ステージング領域はRAM上に配置されているため、rebootやpoweroffによって電源断が発生すると格納されたデータは消去されます。
uci set <config>.<section>=<section-type>
root@OpenWrt:~# touch /etc/config/coffee
root@OpenWrt:~# uci set coffee.arabica=beans
root@OpenWrt:~# uci set coffee.robusta=beans
root@OpenWrt:~# cat /tmp/.uci/coffee
coffee.arabica='beans'
coffee.robusta='beans'
uci set <config>.<section>.<option>=<value>
USAGE1の内容
root@OpenWrt:~# touch /etc/config/coffee
root@OpenWrt:~# uci set coffee.arabica=beans
root@OpenWrt:~# uci set coffee.robusta=beans
↓↓↓ここからが本題
root@OpenWrt:~# uci set coffee.arabica.scent='very good'
root@OpenWrt:~# uci set coffee.arabica.taste=excellent
root@OpenWrt:~# uci set coffee.robusta.scent=good
root@OpenWrt:~# uci set coffee.robusta.taste=good
root@OpenWrt:~# cat /tmp/.uci/coffee
coffee.arabica='beans'
coffee.robusta='beans'
coffee.arabica.scent='very good'
coffee.arabica.taste='excellent'
coffee.robusta.scent='good'
coffee.robusta.taste='good'
指定セクションやパラメーターを削除して、その結果をステージング領域である/tmp/.uciに保存します。
通常、続けてcommitコマンドを実行することでステージング領域(/tmp/.uci)の削除内容がFLASH領域(/etc/config) の対応するUCIコンフィグレーションファイルにコピー(マージ)されます。
※ステージング領域はRAM上に配置されるため、rebootやpoweroffによって電源断が発生すると格納データは消去されます。
uci delete <config>.<section>
テスト用UCIコンフィグレーションファイルの作成
root@OpenWrt:~# touch /etc/config/coffee
root@OpenWrt:~# uci set coffee.arabica=beans
root@OpenWrt:~# uci set coffee.robusta=beans
root@OpenWrt:~# uci commit
↓↓↓ここからが本題
root@OpenWrt:~# uci delete coffee.arabica
root@OpenWrt:~# cat /tmp/.uci/coffee
-coffee.arabica
uci delete <config>.<section>.<option>
テスト用UCIコンフィグレーションファイルの作成
root@OpenWrt:~# touch /etc/config/coffee
root@OpenWrt:~# uci set coffee.arabica=beans
root@OpenWrt:~# uci set coffee.robusta=beans
root@OpenWrt:~# uci set coffee.arabica.scent='very good'
root@OpenWrt:~# uci set coffee.arabica.taste=excellent
root@OpenWrt:~# uci set coffee.robusta.scent=good
root@OpenWrt:~# uci set coffee.robusta.taste=good
root@OpenWrt:~# uci commit coffee
↓↓↓ここからが本題
root@OpenWrt:~# uci delete coffee.robusta.scent
root@OpenWrt:~# cat /tmp/.uci/coffee
-coffee.robusta.scent
setコマンドやdeleteコマンド、addコマンドなどによってステージング領域(/tmp/.uci)に保存されたパラメーター変更内容を FLASH領域(/etc/config)の対応するUCIコンフィグレーションファイルにコピー(マージ)します。
正常にcommitコマンドが実行されると、ステージング領域(/tmp/.uci)内の該当UCIコンフィグレーションファイルとそのパラメーターは消去されます。
通常、commitコマンド実行後は対象のUCIコンフィグレーションファイルを環境変数として使用するアプリケーション に対し、「/etc/init.d/network [reload or restart]」などを実行することで設定値を適用します。
uci commit
テスト用UCIコンフィグレーションファイルcoffeeの作成
root@OpenWrt:~# touch /etc/config/coffee
root@OpenWrt:~# uci set coffee.arabica=beans
root@OpenWrt:~# uci set coffee.robusta=beans
root@OpenWrt:~# uci set coffee.arabica.scent='very good'
root@OpenWrt:~# uci set coffee.arabica.taste=excellent
root@OpenWrt:~# uci set coffee.robusta.scent=good
root@OpenWrt:~# uci set coffee.robusta.taste=good
続けて、テスト用UCIコンフィグレーションファイルteaの作成
root@OpenWrt:~# touch /etc/config/tea
root@OpenWrt:~# uci set tea.darjeeling=leaf
root@OpenWrt:~# uci set tea.uva=leaf
root@OpenWrt:~# uci set tea.darjeeling.scent='very good'
root@OpenWrt:~# uci set tea.darjeeling.taste=excellent
root@OpenWrt:~# uci set tea.uva.scent=excellent
root@OpenWrt:~# uci set tea.uva.taste=excellent
root@OpenWrt:~# cat /tmp/.uci/coffee   <--上の操作で、ステージング領域に追加内容が入ってます
coffee.arabica='beans'
coffee.robusta='beans'
coffee.arabica.scent='very good'
coffee.arabica.taste='excellent'
coffee.robusta.scent='good'
coffee.robusta.taste='good'
root@OpenWrt:~# cat /tmp/.uci/tea     <--上の操作で、ステージング領域に追加内容が入ってます
tea.darjeeling='leaf'
tea.uva='leaf'
tea.darjeeling.scent='very good'
tea.darjeeling.taste='excellent'
tea.uva.scent='excellent'
tea.uva.taste='excellent'
root@OpenWrt:~# cat /etc/config/coffee   <--この時点では何も入っていないので表示されません
root@OpenWrt:~# cat /etc/config/tea
root@OpenWrt:~# uci commit      <--ステージング領域からFLASH領域へマージ(コミット)
root@OpenWrt:~# cat /etc/config/coffee   <--コミットされたので、追加内容が入ってます

config beans 'arabica'
        option scent 'very good'
        option taste 'excellent'

config beans 'robusta'
        option scent 'good'
        option taste 'good'

root@OpenWrt:~# cat /etc/config/tea   <--コミットされたので、追加内容が入ってます

config leaf 'darjeeling
        option scent 'very good'
        option taste 'excellent'

config leaf 'uva'
        option scent 'excellent'
        option taste 'excellent'
uci commit <config>
テスト用UCIコンフィグレーションファイルcoffeeの作成
root@OpenWrt:~# touch /etc/config/coffee
root@OpenWrt:~# uci set coffee.arabica=beans
root@OpenWrt:~# uci set coffee.robusta=beans
root@OpenWrt:~# uci set coffee.arabica.scent='very good'
root@OpenWrt:~# uci set coffee.arabica.taste=excellent
root@OpenWrt:~# uci set coffee.robusta.scent=good
root@OpenWrt:~# uci set coffee.robusta.taste=good
続けて、テスト用UCIコンフィグレーションファイルteaの作成
root@OpenWrt:~# touch /etc/config/tea
root@OpenWrt:~# uci set tea.darjeeling=leaf
root@OpenWrt:~# uci set tea.uva=leaf
root@OpenWrt:~# uci set tea.darjeeling.scent='very good'
root@OpenWrt:~# uci set tea.darjeeling.taste=excellent
root@OpenWrt:~# uci set tea.uva.scent=excellent
root@OpenWrt:~# uci set tea.uva.taste=excellent
root@OpenWrt:~# cat /tmp/.uci/coffee   <--上の操作で、ステージング領域に追加内容が入ってます
coffee.arabica='beans'
coffee.robusta='beans'
coffee.arabica.scent='very good'
coffee.arabica.taste='excellent'
coffee.robusta.scent='good'
coffee.robusta.taste='good'
root@OpenWrt:~# cat /tmp/.uci/tea     <--上の操作で、ステージング領域に追加内容が入ってます
tea.darjeeling='leaf'
tea.uva='leaf'
tea.darjeeling.scent='very good'
tea.darjeeling.taste='excellent'
tea.uva.scent='excellent'
tea.uva.taste='excellent'
root@OpenWrt:~# cat /etc/config/coffee   <--この時点では何も入っていないので表示されません
root@OpenWrt:~# cat /etc/config/tea
root@OpenWrt:~# uci commit coffee    <--coffeeに対して、ステージング領域からFLASH領域へマージ(コミット)
root@OpenWrt:~# cat /etc/config/coffee   <--コミットされたので、追加内容が入ってます

config beans 'arabica'
        option scent 'very good'
        option taste 'excellent'

config beans 'robusta'
        option scent 'good'
        option taste 'good'

root@OpenWrt:~# cat /etc/config/tea   <--コミットされてないので、何も入ってません
root@OpenWrt:~#
setコマンドやdeleteコマンド、addコマンドによってステージング領域(/tmp/.uci)に保存されたパラメーター変更内容を消去します。
uci revert <config>
テスト用UCIコンフィグレーションファイルの作成
root@OpenWrt:~# touch /etc/config/robot
root@OpenWrt:~# uci set robot.GM=MobileSuit
root@OpenWrt:~# uci set robot.GM.affiliation=EFSF
root@OpenWrt:~# uci set robot.GM.height='18.0[m] (by wikipedia)'
root@OpenWrt:~# uci set robot.GM.weight='41.2[t] (by wikipedia)'
root@OpenWrt:~# uci set robot.GM.weapon='spray gun'
root@OpenWrt:~# uci commit
↓↓↓ここからが本題
root@OpenWrt:~# uci delete robot.GM.weapon
root@OpenWrt:~# cat /tmp/.uci/robot
-robot.GM.weapon
root@OpenWrt:~# uci revert robot
root@OpenWrt:~# cat /tmp/.uci/robot
root@OpenWrt:~#
uci revert <config>.<section>
テスト用UCIコンフィグレーションファイルの作成
root@OpenWrt:~# touch /etc/config/robot
root@OpenWrt:~# uci set robot.GM=MobileSuit
root@OpenWrt:~# uci set robot.GM.affiliation=EFSF
root@OpenWrt:~# uci set robot.GM.height='18.0[m] (by wikipedia)'
root@OpenWrt:~# uci set robot.GM.weight='41.2[t] (by wikipedia)'
root@OpenWrt:~# uci set robot.GM.weapon='spray gun'
root@OpenWrt:~# uci set robot.ZAKU=MobileSuit
root@OpenWrt:~# uci set robot.ZAKU.affiliation=ZEON
root@OpenWrt:~# uci set robot.ZAKU.height='17.5[m] (by wikipedia)'
root@OpenWrt:~# uci set robot.ZAKU.weight='75.2[t] (by wikipedia)'
root@OpenWrt:~# uci set robot.ZAKU.weapon='zaku machinegun'
root@OpenWrt:~# uci commit
↓↓↓ここからが本題
root@OpenWrt:~# uci delete robot.GM.weapon
root@OpenWrt:~# uci delete robot.ZAKU.weapon
root@OpenWrt:~# cat /tmp/.uci/robot
-robot.GM.weapon
-robot.ZAKU.weapon
root@OpenWrt:~# uci revert robot.ZAKU
root@OpenWrt:~# cat /tmp/.uci/robot
-robot.GM.weapon
uci revert <config>.<section>.<option>
テスト用UCIコンフィグレーションファイルの作成
root@OpenWrt:~# touch /etc/config/robot
root@OpenWrt:~# uci set robot.ZAKU=MobileSuit
root@OpenWrt:~# uci set robot.ZAKU.affiliation=ZEON
root@OpenWrt:~# uci set robot.ZAKU.height='17.5[m] (by wikipedia)'
root@OpenWrt:~# uci set robot.ZAKU.weight='75.2[t] (by wikipedia)'
root@OpenWrt:~# uci set robot.ZAKU.weapon='zaku machinegun'
↓↓↓ここからが本題
root@OpenWrt:~# uci show robot
robot.ZAKU='MobileSuit'
robot.ZAKU.affiliation='ZEON'
robot.ZAKU.height='17.5[m] (by wikipedia)'
robot.ZAKU.weight='75.2[t] (by wikipedia)'
robot.ZAKU.weapon='zaku machinegun'
root@OpenWrt:~# uci revert robot.ZAKU.affiliation
root@OpenWrt:~# uci revert robot.ZAKU.weight
root@OpenWrt:~# cat /tmp/.uci/robot
robot.ZAKU='MobileSuit'
robot.ZAKU.height='17.5[m] (by wikipedia)'
robot.ZAKU.weapon='zaku machinegun'
指定セクションのタイプ情報やパラメーター(option)の値を取得します。
通常、getコマンドはスクリプトやプログラム内で使用します。
uci get <config>.<section>
-qをつけて実行します。
root@OpenWrt:~# getdata=$(uci -q get network.lan)
root@OpenWrt:~# echo $getdata
interface
uci get <config>.<section>.<option>
-qをつけて実行します。
root@OpenWrt:~# getdata=$(uci -q get network.lan.ipaddr)
root@OpenWrt:~# echo $getdata
192.168.2.1
指定したタイプ情報で匿名セクションを任意のUCIコンフィグレーションファイルに追加します。 追加内容はステージング領域(/tmp/.uci)に保存されます。
通常、続いてcommitコマンドを実行することでステージング領域の追加内容をFLASH領域(/etc/config)にコピーします。
※ステージング領域はRAM上に配置されるため、rebootやpoweroffによって電源断が発生すると格納データは消去されます。
uci add <config> <section-type>
root@OpenWrt:~# touch /etc/config/test
root@OpenWrt:~# uci add test utakamo
cfg066b17
root@OpenWrt:~# cat /tmp/.uci/test
+test.cfg066b17='utakamo'
root@OpenWrt:~# uci commit
root@OpenWrt:~# uci show test
test.@utakamo[0]=utakamo
任意のセクションにリストデータを作成して追加します。
リストデータの追加内容はステージング領域(/tmp/.uci)に保存されます。
通常、続けてcommitコマンドを実行することでステージング領域(/tmp/.uci/)の追加内容がFLASH領域(/etc/config/) の対応するUCIコンフィグレーションファイルにコピー(マージ)されます。
※ステージング領域はRAM上に配置されるため、rebootやpoweroffによって電源断が発生すると格納データは消去されます。
uci add_list <config>.<section>.<option>=<string>
root@OpenWrt:~# touch /etc/config/test
root@OpenWrt:~# uci add test utakamo
cfg066b17
root@OpenWrt:~# uci add_list test.@utakamo[0].testlist=1
root@OpenWrt:~# uci add_list test.@utakamo[0].testlist=2
root@OpenWrt:~# uci add_list test.@utakamo[0].testlist=3
root@OpenWrt:~# uci add_list test.@utakamo[0].testlist=4
root@OpenWrt:~# uci add_list test.@utakamo[0].testlist=5
root@OpenWrt:~# cat /tmp/.uci/test
+test.cfg066b17='utakamo'
|test.cfg066b17.testlist='1'
|test.cfg066b17.testlist='2'
|test.cfg066b17.testlist='3'
|test.cfg066b17.testlist='4'
|test.cfg066b17.testlist='5'
任意のセクションのリストデータを削除します。
リストデータの削除内容はステージング領域(/tmp/.uci)に保存されます。
通常、続けてcommitコマンドを実行することでステージング領域(/tmp/.uci/)の削除内容がFLASH領域(/etc/config/) の対応するUCIコンフィグレーションファイルにコピー(マージ)されます。
※ステージング領域はRAM上に配置されるため、rebootやpoweroffによって電源断が発生すると格納データは消去されます。
uci del_list <config>.<section>.<option>=<string>
テスト用UCIコンフィグレーションファイルの作成
root@OpenWrt:~# touch /etc/config/test
root@OpenWrt:~# uci add test utakamo
cfg066b17
root@OpenWrt:~# uci add_list test.@utakamo[0].testlist=1
root@OpenWrt:~# uci add_list test.@utakamo[0].testlist=2
root@OpenWrt:~# uci add_list test.@utakamo[0].testlist=3
root@OpenWrt:~# uci commit test
↓↓↓ここからが本題
root@OpenWrt:~# uci del_list test.@utakamo[0].testlist=2
root@OpenWrt:~# cat /tmp/.uci/test
~test.cfg066b17.testlist='2'
uci rename <config>.<section>=<name>
テスト用UCIコンフィグレーションファイルの作成
root@OpenWrt:~# touch /etc/config/test
root@OpenWrt:~# uci add test blog
cfg01a6c9
root@OpenWrt:~# uci show test
test.@blog[0]=blog
root@OpenWrt:~# uci set test.@blog[0].data1=GoodMorning
root@OpenWrt:~# uci set test.@blog[0].data2=Hello
root@OpenWrt:~# uci set test.@blog[0].data3=GoodNight
root@OpenWrt:~# uci commit
↓↓↓ここからが本題
root@OpenWrt:~# uci show test
test.@blog[0]=blog
test.@blog[0].data1='GoodMorning'
test.@blog[0].data2='Hello'
test.@blog[0].data3='GoodNight'
root@OpenWrt:~# uci rename test.@blog[0]=utakamo  <--セクションをutakamoに変更
root@OpenWrt:~# cat /tmp/.uci/test
@test.cfg01a6c9='utakamo'
root@OpenWrt:~# uci commit
root@OpenWrt:~# uci show test
test.utakamo=blog
test.utakamo.data1='GoodMorning'
test.utakamo.data2='Hello'
test.utakamo.data3='GoodNight'
uci rename <config>.<section>.<option>=<name>
テスト用UCIコンフィグレーションファイルの作成
root@OpenWrt:~# touch /etc/config/test
root@OpenWrt:~# cat /etc/config/test
root@OpenWrt:~# uci add test utakamo
cfg016b17
root@OpenWrt:~# uci set test.@utakamo[0].data=hello
root@OpenWrt:~# cat /tmp/.uci/test
+test.cfg016b17='utakamo'
test.cfg016b17.data='hello'
root@OpenWrt:~# uci commit
↓↓↓ここからが本題
root@OpenWrt:~# uci show test
test.@utakamo[0]=utakamo
test.@utakamo[0].data='hello'
root@OpenWrt:~# uci rename test.@utakamo[0].data=value  <--オプション名をvalueに変更
root@OpenWrt:~# cat /tmp/.uci/test
@test.cfg016b17.data='value'
root@OpenWrt:~# uci commit
root@OpenWrt:~# uci show test
test.@utakamo[0]=utakamo
test.@utakamo[0].value='hello'
uci reorder <config>.<section>=<position-index>
Programmable表記
root@OpenWrt:~# uci show test
test.sectionA=typeA  <--pos:0
test.sectionA.value1='1'
test.sectionA.value2='2'
test.sectionA.value3='3'
test.sectionB=typeB  <--pos:1
test.sectionB.value1='4'
test.sectionB.value2='5'
test.sectionB.value3='6'
test.sectionC=typeC  <--pos:2
test.sectionC.value1='7'
test.sectionC.value2='8'
test.sectionC.value3='9'

Human-Friendly表記
root@OpenWrt:~# cat /etc/config/test

config typeA 'sectionA'  <--pos:0
        option value1 '1'
        option value2 '2'
        option value3 '3'

config typeB 'sectionB'  <--pos:1
        option value1 '4'
        option value2 '5'
        option value3 '6'

config typeC 'sectionC'  <--pos:2
        option value1 '7'
        option value2 '8'
        option value3 '9'
root@OpenWrt:~# uci reorder test.sectionB=0
root@OpenWrt:~# uci changes test
test.sectionB='0'  <--タイプが変更されたわけではなく、配置場所を示す数字が=付きで表現されます
root@OpenWrt:~# uci commit test

Programmable表記
root@OpenWrt:~# uci show test
test.sectionB=typeB  <--pos:0
test.sectionB.value1='4'
test.sectionB.value2='5'
test.sectionB.value3='6'
test.sectionA=typeA  <--pos:1
test.sectionA.value1='1'
test.sectionA.value2='2'
test.sectionA.value3='3'
test.sectionC=typeC  <--pos:2
test.sectionC.value1='7'
test.sectionC.value2='8'
test.sectionC.value3='9'

Human-Friendly表記
root@OpenWrt:~# cat /etc/config/test

config typeB 'sectionB'  <--pos:0
        option value1 '4'
        option value2 '5'
        option value3 '6'

config typeA 'sectionA'  <--pos:1
        option value1 '1'
        option value2 '2'
        option value3 '3'

config typeC 'sectionC'  <--pos:2
        option value1 '7'
        option value2 '8'
        option value3 '9'
uci export
root@OpenWrt:~# uci export
package dropbear

config dropbear
        option PasswordAuth 'on'
        option RootPasswordAuth 'on'
        option Port '22'

package duckdump

config duckdump 'target'
        option nic 'wlan0'

package firewall

config defaults
        option syn_flood '1'
        option input 'ACCEPT'
        option output 'ACCEPT'
        option forward 'REJECT'

...省略
root@OpenWrt:~# uci export > full_backup
uci export <config>
root@OpenWrt:~# uci export dropbear
package dropbear

config dropbear
        option PasswordAuth 'on'
        option RootPasswordAuth 'on'
        option Port '22'
root@OpenWrt:~# uci export dropbear > dropbear_backup
[TIPS]: UCI構文
exportコマンドによって出力されるUCI設定情報はUCI構文形式です。
Human-Friendly表記形式に加え、UCIコンフィグレーションファイル名をpackage <file-name>の形式で記載しているだけです。
root@OpenWrt:~# uci export sample
package sample   <---UCIコンフィグレーションファイル名を指します

config type 'section'
    option value1 '1'
    option value2 '2'
    option value3 '3'
UCI設定を対象ファイルにインポートします。
uci import <config>
root@OpenWrt:~# touch /etc/config/test
root@OpenWrt:~# uci import test
package test
config typeA 'section'
    option value1 '1'
    option value2 '2'
    option value3 '3'
「CTRL + D」でEOF
root@OpenWrt:~# uci show test
test.section=typeA
test.section.value1='1'
test.section.value2='2'
test.section.value3='3'
uci -f <file> import <config>
テスト用UCIコンフィグレーションファイルの作成
root@OpenWrt:cd /etc/config
root@OpenWrt:/etc/config# touch test
root@OpenWrt:/etc/config# uci set test.blog=utakamo
root@OpenWrt:/etc/config# uci set test.blog.data1=hello
root@OpenWrt:/etc/config# uci set test.blog.data2=byebye
root@OpenWrt:/etc/config# uci commit
root@OpenWrt:/etc/config# uci show test
test.blog=utakamo
test.blog.data1='hello'
test.blog.data2='byebye'
↓↓↓ここからが本題
root@OpenWrt:/etc/config# uci export dropbear > dropbear_backup  <--dropbearをエクスポート
root@OpenWrt:/etc/config# uci -f dropbear_backup import test  <--ここでインポート
root@OpenWrt:/etc/config# uci show test
test.@dropbear[0]=dropbear
test.@dropbear[0].PasswordAuth='on'
test.@dropbear[0].RootPasswordAuth='on'
test.@dropbear[0].Port='22'
uci -f <file> -m import <config>
テスト用UCIコンフィグレーションファイルの作成
root@OpenWrt:~# cd /etc/config
root@OpenWrt:/etc/config# touch test
root@OpenWrt:/etc/config# uci add test utakamo
cfg016b17
root@OpenWrt:/etc/config# uci set test.@utakamo[0].data=1
root@OpenWrt:/etc/config# uci show test
test.@utakamo[0]=utakamo
test.@utakamo[0].data='1'
↓↓↓ここからが本題
root@OpenWrt:/etc/config# uci export dropbear > dropbear_backup  <--dropbearをエクスポート
root@OpenWrt:/etc/config# uci -f dropbear_backup -m import test  <--ここでマージインポート
root@OpenWrt:/etc/config# uci changes test
test.cfg024dd4='dropbear'0'
test.cfg024dd4.PasswordAuth='on'
test.cfg024dd4.RootPasswordAuth='on'
test.cfg024dd4.Port='22'.5'
root@OpenWrt:/etc/config# uci commit
root@OpenWrt:/etc/config# uci show test
test.@utakamo[0]=utakamo
test.@utakamo[0].data='1'
test.@dropbear[0]=dropbear
test.@dropbear[0].PasswordAuth='on'
test.@dropbear[0].RootPasswordAuth='on'
test.@dropbear[0].Port='22'
uci changes
root@OpenWrt:~# touch /etc/config/test1
root@OpenWrt:~# uci set test1.blog=utakamo
root@OpenWrt:~# uci set test1.blog.data=hello
root@OpenWrt:~# touch /etc/config/test2
root@OpenWrt:~# uci set test2.blog=utakamo
root@OpenWrt:~# uci set test2.blog.data=goodbye
root@OpenWrt:~# uci changes
test1.blog='utakamo'
test1.blog.data='hello'
test2.blog='utakamo'
test2.blog.data='goodbye'
uci changes <config>
root@OpenWrt:~# touch /etc/config/test1
root@OpenWrt:~# uci set test1.blog=utakamo
root@OpenWrt:~# uci set test1.blog.data=hello
root@OpenWrt:~# touch /etc/config/test2
root@OpenWrt:~# uci set test2.blog=utakamo
root@OpenWrt:~# uci set test2.blog.data=goodbye
root@OpenWrt:~# uci changes test1
test1.blog='utakamo'
test1.blog.data='hello'
uci batch << EOI
<uci command>
<uci command>
<uci command>
<uci command>
....
EOI
uciを付ける必要はありません。
root@Openwrt:~# touch /etc/config/test
root@OpenWrt:~# uci batch << EOI
> set test.blog=utakamo
> set test.blog.data1=hello
> set test.blog.data2='Is my blog easy and readable?'
> set test.blog.data3=goodbye
> EOI
root@OpenWrt:~# uci changes test
test.blog='utakamo'
test.blog.data1='hello'
test.blog.data2='Is my blog easy and readable?'
test.blog.data3='goodbye'
root@OpenWrt:~# uci batch << EOI
> set network.test=utakamo
> set network.test.data1=hello
> set network.test.data2='Is my blog easy and readable?'
> set network.test.data3=goodbye
> EOI
root@OpenWrt:~# uci changes network
network.test='utakamo'
network.test.data1='hello'
network.test.data2='Is my blog easy and readable?'
network.test.data3='goodbye'
root@Openwrt:~# touch /etc/config/test
↓↓↓シェル変数を宣言
root@OpenWrt:~# config=test
root@OpenWrt:~# type=utakamo
root@OpenWrt:~# section=blog
↓↓↓シェル変数を基にバッチ処理
root@OpenWrt:~# uci batch << EOI
> set $config.$section=$type
> set $config.$section.data1=hello
> set $config.$section.data2='Is my blog easy and readable?'
> set $config.$section.data3=goodbye
> EOI
root@OpenWrt:~# uci changes test
test.blog='utakamo'
test.blog.data1='hello'
test.blog.data2='Is my blog easy and readable?'
test.blog.data3='goodbye'

2026年版 ロボット掃除機の選び方 おすすめモデル5選
ロボット掃除機の選び方を、吸引力、水拭き、マッピング、全自動ステーション、障害物回避から整理し、代表メーカーとモ デルを紹介します。

2026年版 最新おすすめスマートフォン 11選 ローエンドからハイエンドモデルまで
スマートフォンの選び方を、OS、SoC、RAM、AI機能、カメラ、バッテリーなどの基礎知識から整理し、価格帯別の注目モデル11機種を紹介し ます。

OCuLinkとは何か? 小型PCやミニPCの購入前に知っておきたいポイントを整理
OCuLinkとは何かを、小型PCやミニPCの購入を検討している人向けに整理します。USB4やThunderboltとの違い、eGPU用途で気にしたいポイント、製品ページでの確認点をまとめています。

2026年版 家庭用プロジェクターの選び方 用途別おすすめモデル5選
家庭用プロジェクターを初めて選ぶ人向けに、明るさ、解像度、投写距離、内蔵OS、設置方法を整理し、用途別に代表6機種を紹介します。

超格安な日本発のマイコンボード UIAPduinoの紹介
290円という価格が目を引く日本発のマイコンボードについて、主な仕様、安さの背景、向 く用途、定番ボードとの違いをまとめて紹介します。

接続・出力・電源で選ぶ 初めてのスマホ向けポータブルアンプ5選
ポータブルアンプを初めて購入する人向けに、ヘッドホンの駆動力を補う仕組みや音の調整、ハイレゾ再生の楽しみ方を解説。接続方法・出力・電源の選び方と、おすすめ5機種を紹介します。